

Premium and Discount Zones: Buy Cheap, Sell Expensive
Premium and discount zones split any swing at the 50% level. Buy below it (discount) in uptrends, sell above it (premium) in downtrends. Here's how.

Premium and discount zones split any price swing into two halves at the 50% level. Everything above 50% is the premium zone (price is expensive). Everything below is the discount zone (price is cheap). In an uptrend, you want buy entries in the discount zone. In a downtrend, you want sell entries in the premium zone. This one filter removes a huge chunk of bad entries because it forces you to only trade from locations where the math actually works: tight stops, wide targets, and favorable risk-to-reward. It applies to any market, any timeframe.
TL;DR
Premium = expensive, discount = cheap. The 50% level of any swing separates them.
Buy in discount during uptrends, sell in premium during downtrends. Doing the opposite wrecks your risk-to-reward ratio.
The 50% level itself is no-man's-land. Don't enter there. Wait for price to pick a side.
Combine with supply and demand zones for higher-probability entries. Location plus institutional order flow is a strong filter.
Always check the higher timeframe first. A 5-minute discount inside a daily premium zone is still an expensive trade.
What Premium and Discount Zones Actually Are
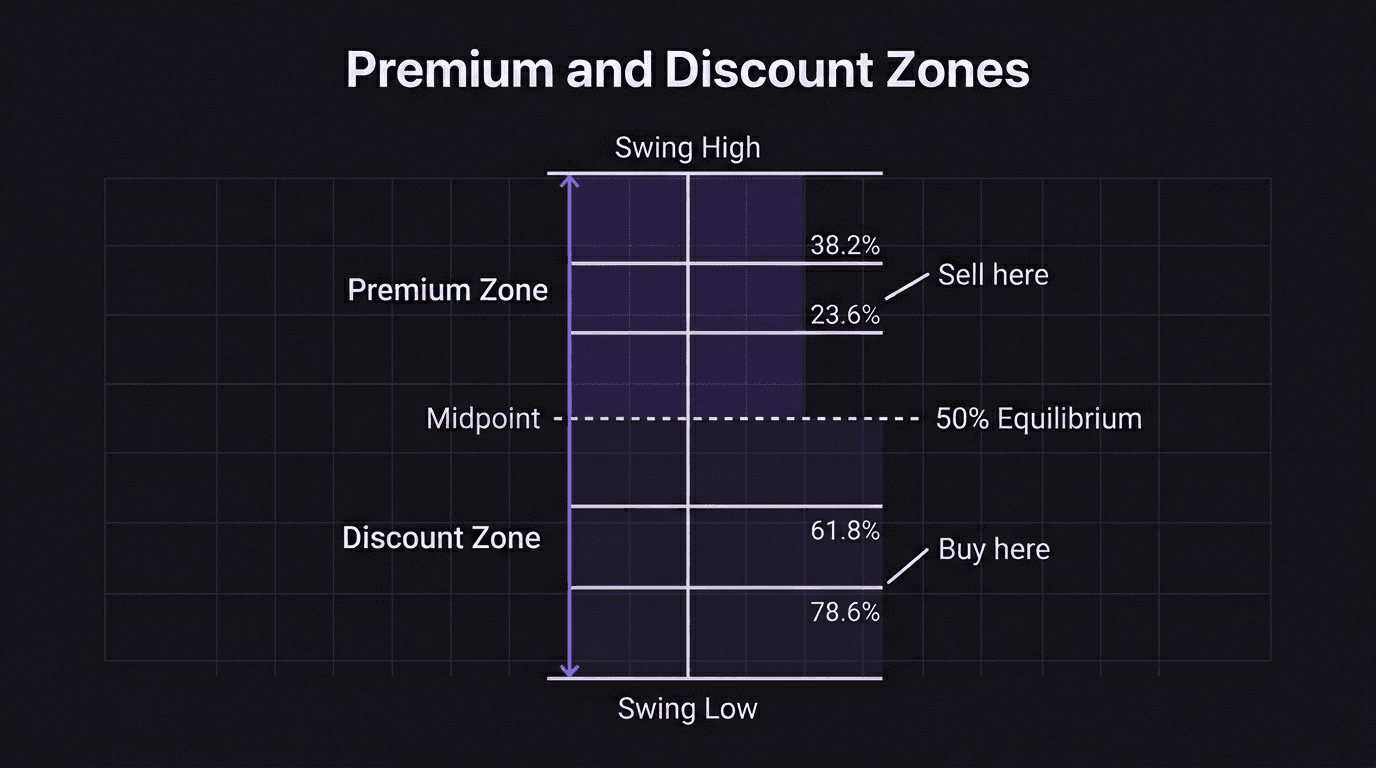
Every price swing has a high and a low. The midpoint between them (the 50% level) is called equilibrium. That's your dividing line.
Above equilibrium: premium zone. Price is expensive relative to the swing. Below equilibrium: discount zone. Price is cheap relative to the swing.
You wouldn't pay full price for a shirt that goes on sale every two weeks. Same idea on the chart. If price regularly pulls back to the lower half of a swing before continuing, why would you buy in the upper half? You'd be paying retail when a discount is coming.
The 50% level itself? That's where a lot of retail traders take entries that go nowhere. You're not buying cheap. You're not selling expensive. You're just sitting in the middle with no edge.
How It Maps to Fibonacci
If you've used Fibonacci retracements before, this clicks fast. The 0% level is the swing low. The 100% level is the swing high. The 50% mark splits them.
The 61.8% and 78.6% retracement levels sit deep inside the discount zone on a bullish swing. The 38.2% and 23.6% sit in premium. This is exactly why Fibonacci entries at 61.8% or 78.6% tend to work better. They're deep discount entries within a bullish move, not just "Fibonacci magic."
Timeframe Matters
A 5-minute swing has premium and discount zones. So does a daily swing. But the daily zones carry far more weight.
A discount zone on the daily chart means something. A discount zone on the 5-minute chart inside a daily premium? That's still an expensive trade. Always know where you stand on the bigger picture.
How to Mark Premium and Discount on Your Chart
You don't need a special indicator for this. The manual method takes under a minute.
Step 1: Find the swing. Identify a clear swing low and swing high on your timeframe. If you trade intraday, use the previous day's range or the current session's developing range. Swing traders: daily or 4-hour chart.
Step 2: Drop the Fibonacci tool. On TradingView, drag the Fibonacci retracement from swing low to swing high (bullish swing) or high to low (bearish swing). The 50% level plots automatically.
Step 3: Label the zones. Everything above the 50% line is premium. Everything below is discount. Some traders shade these with rectangles. Others just note the price level and move on.
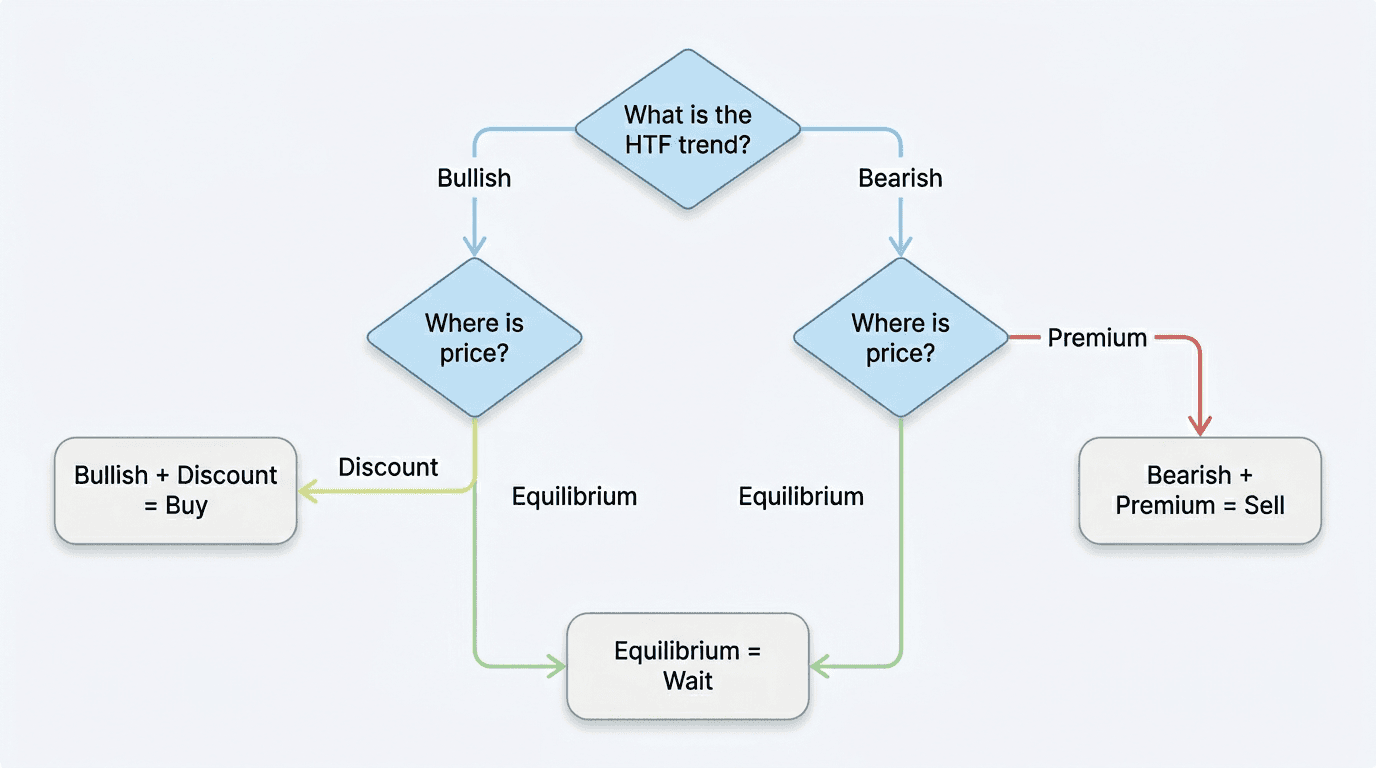
Step 4: Check your bias. Bullish and price is in discount? Good location for a buy. Bearish and price is in premium? Good location for a sell. Price sitting right at 50%? Wait.
Do this at the start of each session as part of your pre-market routine. It becomes automatic after a few days.
Why You Buy in Discount Zones
In an uptrend, price pulls back before continuing higher. Each pullback creates a temporary discount: price dips below the 50% level of the most recent swing.
Buying there means your stop loss is tight (close to the swing low) and your target is far (above the recent high). The risk-to-reward ratio is built into the location.
Buying in the premium zone during an uptrend? Opposite problem. Wide stop, close target. Even if the trade works, it barely pays you. So why take it?
Example: EUR/USD Discount Entry That Worked
On the 1-hour chart, EUR/USD swings from 1.0800 (low) to 1.0900 (high). The 50% level sits at 1.0850.
Price pulls back to 1.0825, deep in the discount zone, right into a demand zone that formed on the way up. The trader waits for a bullish engulfing candle on the 15-minute chart, then enters long.
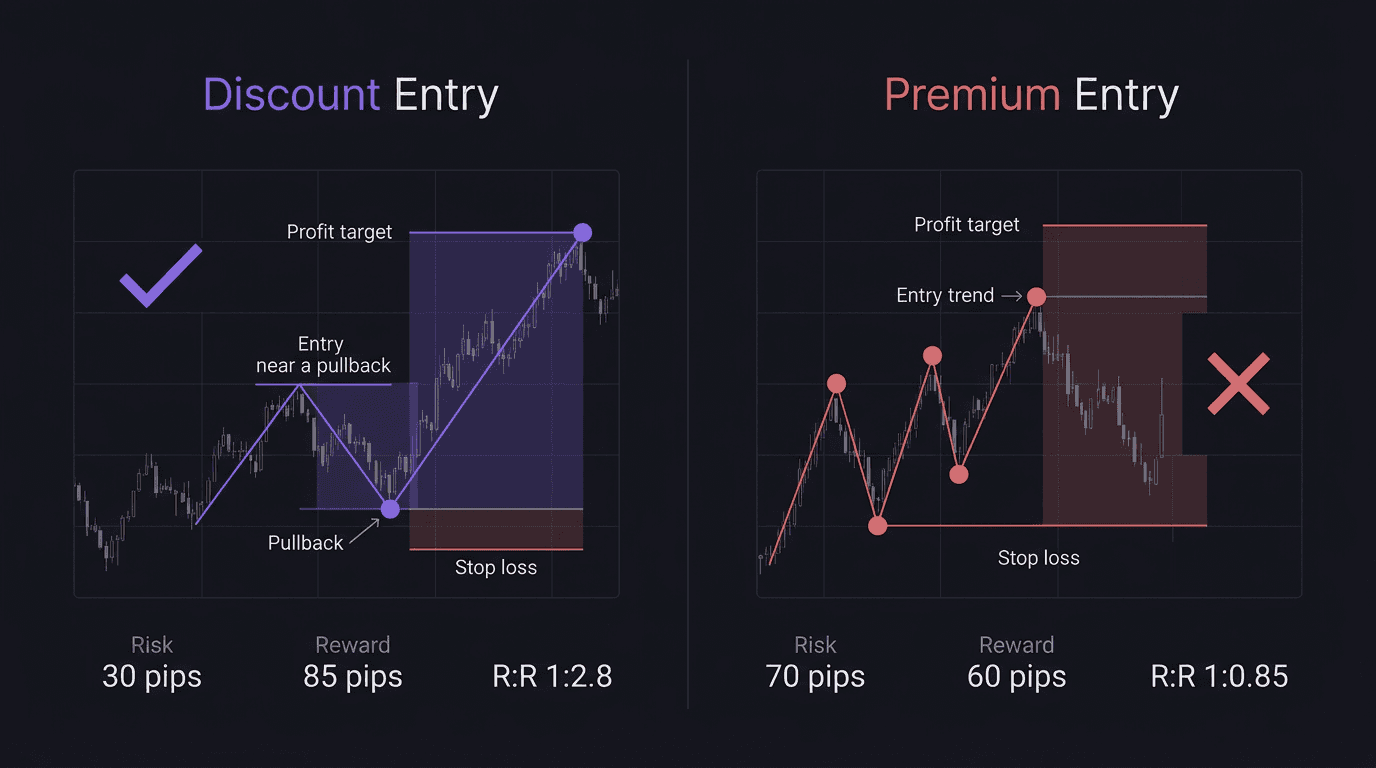
Entry: 1.0825
Stop loss: 1.0795 (below the swing low, 30 pips risk)
Target: 1.0910 (above the previous high, 85 pips reward)
Risk-to-reward: roughly 1:2.8
Price pushes back through equilibrium, retests the high, and breaks above it. The trader closes at target. The discount entry gave them a tight stop and a wide target without needing to predict anything. They just traded from a favorable location. That's the core of sound market structure execution.
Why You Sell in Premium Zones
Same logic, flipped. In a downtrend, each rally is temporary premium. Price pushes above the 50% level of the most recent bearish swing before continuing lower.
Selling in premium gives you:
Tight stop above the swing high (close to your entry)
Wide target toward the next lower low (far from your entry)
Better risk-to-reward on every trade
Selling in the discount zone during a downtrend is selling cheap. Your stop is wide, your target is close, and the trade barely pays you even when it wins. The most common version of this mistake is chasing a move that already happened.
What Happens When You Ignore the Zones
Ever looked back at a trade and realized the entry was the entire problem? Not the direction. Not the pair. Just where you clicked "buy."
That's what trading without premium and discount awareness looks like.
Example: Chasing a GBP/USD Buy Into Premium
GBP/USD drops from 1.2750 to 1.2650 on the 4-hour chart, then starts to rally. The 50% level of that swing is 1.2700.
A trader sees the rally, gets excited, and enters long at 1.2720, already above equilibrium in the premium zone of the bearish swing. They set their stop below 1.2650 (70 pips risk) and target 1.2780 (60 pips reward).
The risk-to-reward is already upside down: 1:0.85. They're risking more than they stand to gain.
Price rallies a bit more to 1.2740, stalls, and reverses. The trader watches it grind back toward their entry, then through it. They hold, hoping for a bounce. It doesn't come. Stopped out for the full 70 pips.
The mistake wasn't the direction (GBP/USD did eventually rally). It was the location. They bought expensive. If they'd waited for price to pull back below 1.2700 into discount, the same trade idea would have had a 30-pip stop and a 100+ pip target.
Same pair, same bias, completely different outcome. Think of it like buying concert tickets. You can grab them from a reseller at 2x face value, or wait and check closer to the date when prices drop. Either way you're going to the show. One just costs you a lot less.
Premium and Discount vs. Supply and Demand
These two frameworks overlap but measure different things. Understanding both sharpens your entries.
Premium and Discount | Supply and Demand | |
|---|---|---|
What it measures | Whether price is cheap or expensive relative to the swing | Where institutional orders were placed |
How it's drawn | 50% level of the swing (Fibonacci retracement) | Areas of strong price rejection or imbalance |
What it tells you | Location within the range | Likely reaction points |
Best use | Filtering direction bias | Timing entries |
The highest-probability setups happen when both align. Price sitting in the discount zone of a bullish swing and on top of a demand zone? That's location plus institutional order flow in your favor.
A demand zone in the premium area deserves caution. It might still produce a reaction, but you're buying expensive. Similarly, a liquidity sweep that takes out lows and pushes price into discount is strong confluence.
Common Mistakes With These Zones
Buying in premium during an uptrend. You see price moving up and want in. By the time you enter, the pullback hasn't happened yet. Either wait for discount or accept you're taking a worse trade.
Ignoring the higher timeframe. A discount zone on the 5-minute chart means little if the daily chart shows price deep in premium. The bigger timeframe overrides. Check your daily bias first.
Trading at equilibrium. The 50% level is not an entry zone. It's the line that separates premium from discount. Price at the midpoint gives you no edge in either direction.
Treating zones as standalone signals. Premium and discount tells you about location. It doesn't tell you when to pull the trigger. You still need a reason to enter: a market structure shift, a demand zone tap, a sweep. These zones answer "should I be looking for buys or sells here?" not "enter now."
Using unclear swing points. If you pick a messy high and low, your 50% level is meaningless. Use swing points you can identify at a glance. If you can't, the range probably isn't clean enough to trade. Backtesting your zone identification helps build that eye over time.
Forgetting to update. Ranges change. A swing that was valid yesterday may be broken today. Refresh your levels at the start of each session, especially after new highs or lows.
How EdgeFlo Supports Zone-Based Trading
Knowing where premium and discount zones are is the easy part. Consistently waiting for price to reach them (instead of chasing) is the hard part. How many times have you marked your zones perfectly, then entered early anyway?
EdgeFlo's Edge Plan Builder lets you write your premium and discount rules directly into your trading plan, pinned next to your chart. When price is in premium and your bias is bullish, the plan is right there reminding you to wait. No mental gymnastics required.
The Dashboard tracks your results by entry location over time. After 30 or 50 trades, you can actually see whether your discount-zone entries outperform your premium-zone entries. That turns a concept from an article into evidence you trust.
The Edge Brief
Receive Insights on trading psychology, discipline, and the behavioral patterns that create consistent traders from our Founder and the EdgeFlo team, delivered to your inbox.
Think different. Trade different.
What is premium and discount in trading?
What are the Fibonacci premium and discount zones?
What are the 4 types of supply and demand zones?
Should you trade at the 50% equilibrium level?

Turn discipline on.
Every session.
EdgeFlo is the environment serious traders operate inside.
Start 7-Day Trial — $7
Cancel anytime.
No long-term commitment.


Think Different, Trade Different.