

Trading Exit Rules: Stop Loss and Take Profit Methods
Define exit rules for winning and losing trades. Compare fixed R targets vs technical exits with Forex examples so you stop cutting winners short.

Trading exit rules define exactly where you get out of a trade, both when it goes wrong and when it goes right. Without them, you end up cutting winning trades early out of fear and letting losing trades run out of hope. Both habits destroy accounts. Exit rules remove the decision from real time and put it back where it belongs: in your plan, written before the trade starts.
TL;DR
Every plan needs two exit rules: a stop loss (protection) and a take profit (capture).
Place your stop loss behind a structural level (swing high/low or supply/demand zone) with a buffer of at least 2 to 3 pips for spread.
For take profit, choose between fixed R (simple, trackable) or technical targets (subjective, potentially larger moves).
Consistent exits produce consistent data, which is the only way to measure and refine your edge.
The goal is not to maximize every trade. The goal is to exit the same way every time so your results are repeatable.
Two Types of Exits Every Plan Needs
When you enter a trade, two outcomes exist. Price moves in your direction, or it does not. Your exit rules must cover both scenarios before you click buy or sell.
Most traders spend hours perfecting entries and about thirty seconds thinking about exits. That imbalance shows up in their results. They find good entries, then fumble the exit. They close winners too early because the profit "feels like enough." They hold losers past their stop because "it might come back."
Sound familiar? That is what happens when exits are discretionary.
A mechanical trade exit strategy has two components:
Stop loss: the price where you accept the trade did not work and take the planned loss
Take profit: the price where you accept the trade worked and capture the planned gain
Both are set before the trade opens. Both are based on your rules, not on how you feel after the candle moves.
The trader who exits the same way every time can measure their results. The trader who improvises exits cannot, because every trade has a different outcome profile. You cannot backtest a strategy if the exits change depending on your mood.
Stop Loss Placement: Where and Why
Your stop loss is not a random number of pips. It is a structural decision. The stop goes at the price where your trade idea is invalid, plus a buffer.
Where to Place It
The most reliable stop loss placements in Forex:
Behind a supply or demand zone. If your entry is a buy from a demand zone, the stop goes below the bottom of that zone. If the zone breaks, your trade thesis is wrong.
Behind a swing high or low. For a buy, the stop goes below the most recent swing low that holds the structure. For a sell, above the most recent swing high.
The key principle: your stop should be at a price where, if reached, the setup is genuinely invalidated. Not just uncomfortable, but structurally wrong.
The Buffer
Raw zone edges and swing points get hit by spread and wicks. Adding a buffer prevents you from getting stopped out by noise.
Minimum 2 to 3 pips behind the level to account for broker spread
5 to 10 pips if you are trading on higher time frames or volatile pairs
Pick a buffer and use it on every trade. "Sometimes 2 pips, sometimes 10 pips" is not a rule. It is a guess.
Walkthrough: Stop Loss Behind a Demand Zone on EUR/USD
You enter a buy at 1.0850 from a 15-minute demand zone. The bottom of the zone is at 1.0835. You add a 5-pip buffer. Your stop loss sits at 1.0830.
Stop distance: 1.0850 to 1.0830 = 20 pips.
At 0.5 lots (EUR/USD = $5/pip): $5 times 20 pips = $100 risk.
If price drops through 1.0835 (the zone bottom), the zone is broken. Your trade thesis is invalid. The extra 5 pips of buffer ensure a wick sweep of the zone does not stop you out on a valid setup.
What Happens When Your Stop Gets Hit and Price Reverses
This will happen. You get stopped out at 1.0830, and price bounces from 1.0825 to rally 100 pips. It feels terrible.
But this is data, not failure. It tells you that your buffer might need to be wider for this pair and time frame. Next review cycle, adjust from 5 pips to 8 pips. Test it. Measure. You can only make that adjustment because you had a consistent rule in the first place.
If you move your stop loss in real time to avoid the hit, you corrupt your data and increase your risk beyond what you planned. That is a worse outcome than one stopped trade.
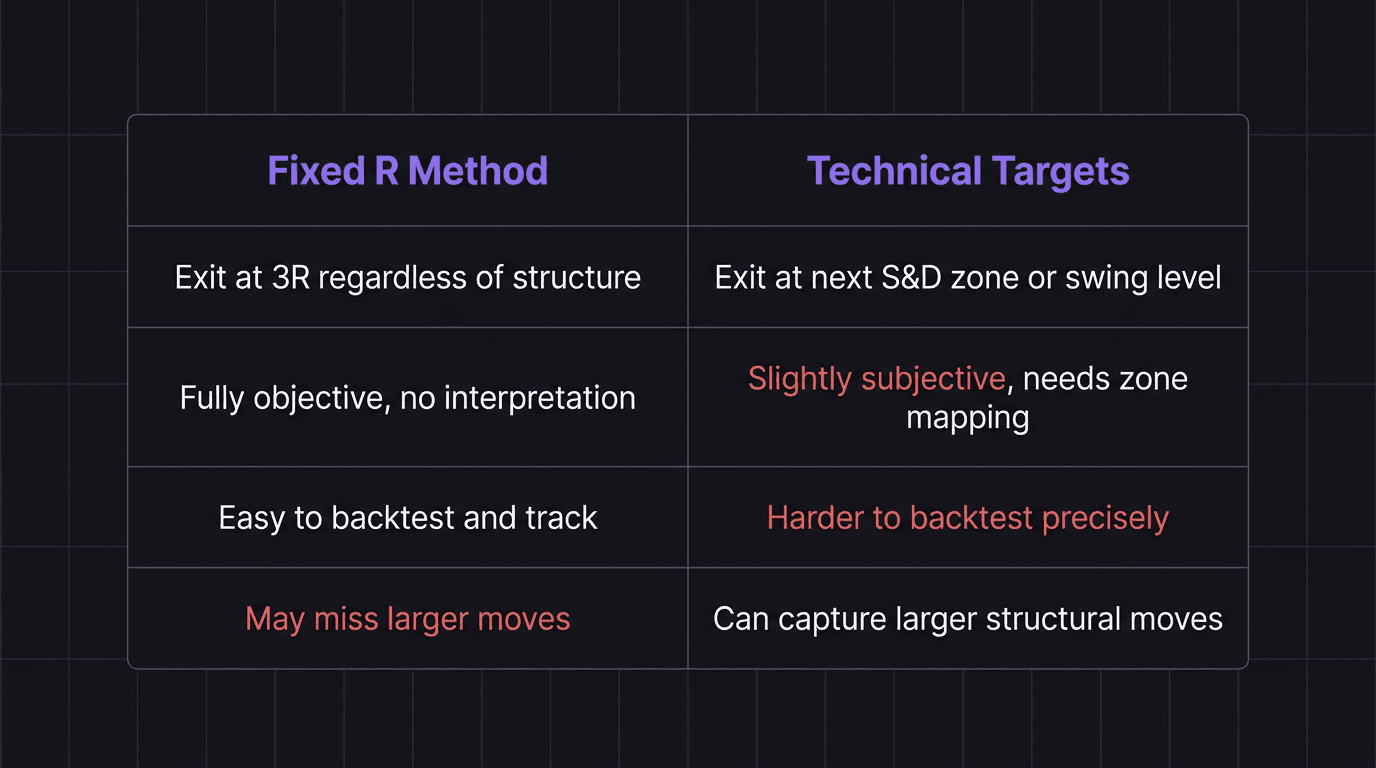
Take Profit Methods: Fixed R vs Technical Targets
This is where most exit confusion lives. How do you decide when to close a winning trade?
Fixed R Method
The fixed R method ties your take profit to your stop loss distance using a risk-reward ratio. If your stop is 20 pips, and you target 3R, your take profit is 60 pips from entry.
Completely objective. No interpretation needed.
Easy to backtest and measure R multiples.
Removes the temptation to "let it run" or "close early."
Sometimes price reaches 2.8R and reverses. You miss the take profit by a few pips and the trade turns into a loss.
Common fixed R targets:
R Multiple | Stop = 20 pips | Take Profit Distance |
|---|---|---|
2R | 20 pips | 40 pips |
3R | 20 pips | 60 pips |
4R | 20 pips | 80 pips |
Walkthrough: Fixed 3R Exit on GBP/USD
Entry: buy GBP/USD at 1.2700. Stop at 1.2675 (25 pips). Target: 3R = 75 pips. Take profit at 1.2775.
Price rallies to 1.2775. You close. Done.
Math check: Entry 1.2700 to stop 1.2675 = 25 pips. Entry 1.2700 to target 1.2775 = 75 pips. 75 / 25 = 3R. Confirmed. At 0.5 lots (GBP/USD = $5/pip): $5 times 25 pips = $125 risk. $5 times 75 pips = $375 reward.
Technical Targets
Technical targets place your take profit at a specific structural level rather than a fixed ratio:
The next supply or demand zone in the path of your trade
The nearest swing high (for buys) or swing low (for sells)
A key level from the higher time frame
Can capture larger moves when structure is favorable
The target has structural significance (price is more likely to react there)
More subjective. Two traders might identify different target levels.
Harder to backtest precisely.
Walkthrough: Technical Target Exit on EUR/USD
Entry: buy EUR/USD at 1.0850. Stop at 1.0830 (20 pips). The next 4-hour supply zone sits at 1.0920.
Target distance: 1.0920 minus 1.0850 = 70 pips. That is 3.5R.
Price rallies to 1.0915 and stalls 5 pips short of the zone. You close based on your rule: exit when price reaches within 5 pips of the target zone.
Math check: Entry 1.0850 to exit 1.0915 = 65 pips captured. At 0.5 lots: $5 times 65 pips = $325. Risk was $5 times 20 pips = $100. Actual R: $325 / $100 = 3.25R.
Neither method is objectively better. The better method is whichever one you will follow consistently without closing trades too early.
Why Consistent Exits Beat Emotional Exits
The single biggest argument for defined exit rules is consistency. Not because consistency feels good, but because consistency produces measurable data.
When your exits change from trade to trade, your results become noise. You cannot tell whether a losing month came from bad entries, bad exits, or bad luck. Your win rate is meaningless because sometimes you closed at 1R, sometimes at 3R, and sometimes you panicked and closed at 0.2R.
With consistent exits, every trade produces a clean data point. Over 50 trades, you can calculate:
Win rate (what percentage hit the take profit?)
Average R on winners (is it actually 3R, or are you closing early?)
Average R on losers (are you holding past the stop?)
Expectancy (are you net positive per trade?)
That data tells you exactly what to fix. If your win rate is 40% but your average winner is 3R and your average loser is 1R, your expectancy is positive. You do not need to change anything except your patience.
If your average winner drops to 1.5R because you keep closing early, the problem is exit discipline, not strategy.
The trader who improvises exits has no access to these insights. They are flying blind, making changes based on feelings instead of evidence. Over time, that randomness compounds into account decay.
How EdgeFlo Helps You Stick to Your Exit Rules
The hardest moment in a trade is when price is near your take profit and starts pulling back. Every instinct screams "close it now before you lose the profit." That impulse is why traders exit too early.
EdgeFlo's trade execution environment keeps your stop and target visible at all times. After the trade closes, the journal auto-imports the result so you can see your actual R versus your planned R. If you consistently close at 2R when your plan says 3R, the data will show it.
The weekly AI report (Plus plan) flags patterns like early exits and moved stops, surfacing the behavior you might not notice on your own. Over time, that awareness turns into the discipline to let your plan run, because you can see the cost of not doing so in your own numbers.
What are the two types of exit rules in trading?
What is the fixed R method for take profit?
Should I use fixed R or technical targets?
How many pips should I place my stop loss behind a zone?

Turn discipline on.
Every session.
EdgeFlo is the environment serious traders operate inside.
Start 7-Day Trial — $7
Cancel anytime.
No long-term commitment.


Think Different, Trade Different.