

Where to Place Your Stop-Loss: Structure-Based Protection
Learn to place stop-losses based on market structure instead of arbitrary pip counts. Three structural anchor points that give your trade room to breathe while capping risk.

Your stop-loss should go where your trade idea is proven wrong, not at a random number of pips from your entry. Structure-based stop placement uses the market's own swing points, flip zones, and sweep levels to define your invalidation point. This gives the trade room to breathe while keeping your risk capped at a specific dollar amount.
The most common stop-loss mistake is choosing an arbitrary distance. "I always use a 20-pip stop." That sounds disciplined, but it ignores what the market is actually doing. If the nearest structural level is 28 pips away, a 20-pip stop sits in no-man's land, where price can easily sweep it before continuing in your direction.
TL;DR
Place stops based on market structure: below the swing low, below the flip zone, or below the sweep low.
Arbitrary pip stops ignore structural context and get swept more often.
Wider structural stops require smaller position sizes to maintain the same dollar risk.
Your stop location determines your position size, not the other way around.
Once price creates new structure above your entry, you can trail your stop to that new level.
Why Arbitrary Pip Stops Fail
A 20-pip stop on EUR/USD and a 20-pip stop on GBP/JPY are not the same thing. EUR/USD might have a range of 60 pips during London session. GBP/JPY might range 120 pips. The same fixed stop handles those two instruments completely differently.
But the bigger problem is not the pair. It is the structure.
If you enter a long trade after a market structure shift and the last higher low is 32 pips below your entry, a 20-pip stop dies in the pullback. Price drops 25 pips (a normal retracement), hits your stop, and then rallies 80 pips to your target. You were right about the direction and wrong about the stop.
This is the most frustrating experience in trading. And it happens because the stop was not anchored to anything structural. It was just a number you picked because it "felt safe."
Trading without a stop-loss is worse. But a badly placed stop can feel almost as destructive because it converts winning ideas into losing trades.
Structure-Based Stop Placement
Structure-based stops use the market's own levels as invalidation points. The logic is simple: if price moves beyond a certain structural point, your trade idea is no longer valid. That point is where your stop belongs.
For a long trade, you are looking for the level below which the bullish structure breaks. For a short trade, you are looking for the level above which the bearish structure breaks.
The key shift in thinking: you choose your stop level first, then calculate your position size from it. The stop determines the size, not the other way around. This is how risk per trade actually works.
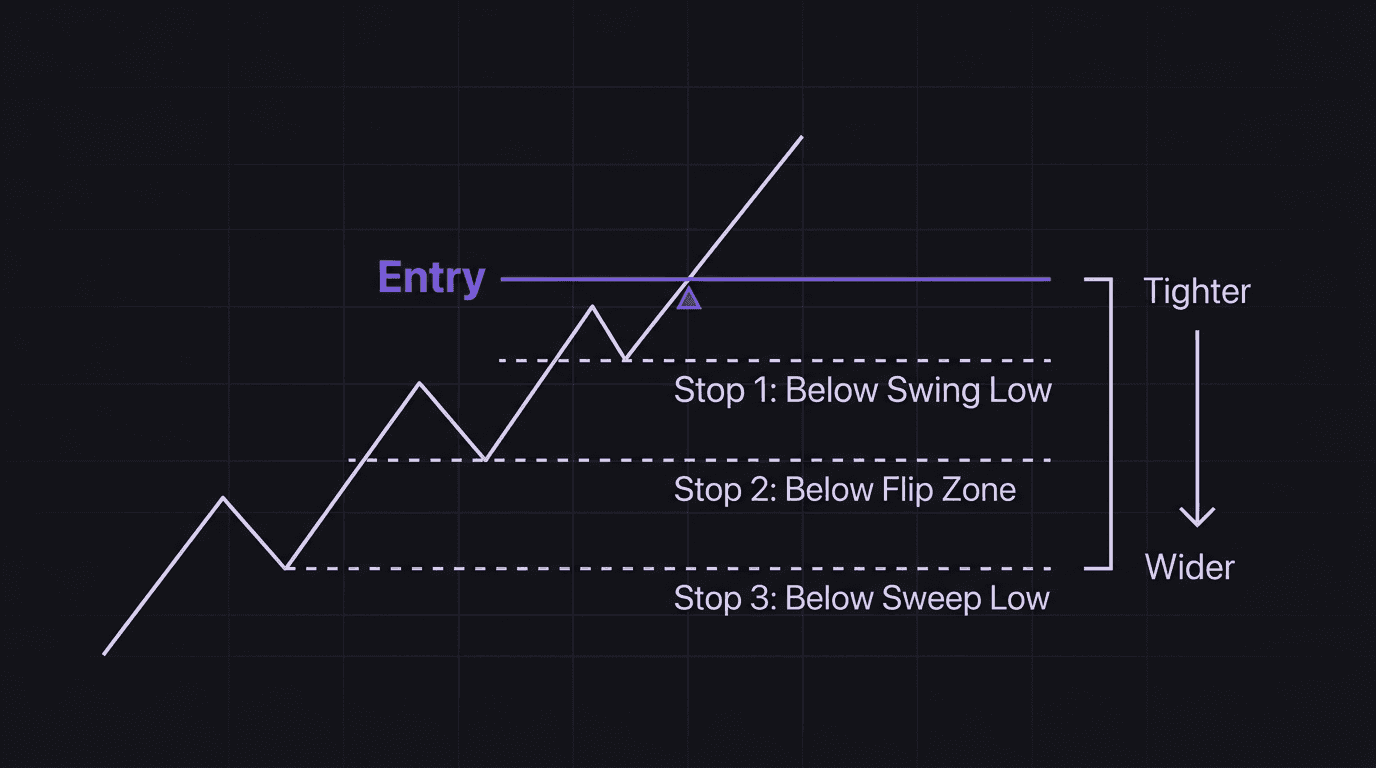
Three Structure Points for Stop Location
1. Below the Swing Low (Continuation Trades)
In a bullish trend, the last higher low is the most recent structural support. If price breaks below it, the higher-low, higher-high pattern is broken and the trend may be reversing. Your stop goes a few pips below this swing low.
This is the most straightforward stop placement. You are saying: "My trade is valid as long as this higher low holds. If it breaks, I am out."
2. Below the Flip Zone (Reversal Trades)
When supply flips to demand (or vice versa), the zone where the flip occurred is your structural anchor. Your stop goes below the flip zone. If price pushes back through the entire zone, the flip has failed and your trade idea is invalidated.
Flip zone stops tend to be tighter than swing low stops because the flip zone is closer to your entry. This gives you better risk-to-reward, but it also means the trade has less room. You are betting on the flip holding on the first attempt.
3. Below the Sweep Low (Liquidity Sweep Trades)
In a sweep setup, price drives below equal lows or a previous swing low, grabs liquidity, and reverses. Your stop goes below the lowest point of the sweep. If price pushes past the sweep low, the liquidity grab has failed and more downside is likely.
This is the widest stop of the three, but it is also the strongest. The sweep already cleared the obvious stops. There is little reason for price to return below that level unless the trade idea is genuinely wrong.
Walkthrough: Placing a Structural Stop on AUD/USD
AUD/USD is in a bullish trend on the 4-hour chart. Price pulls back to a demand zone at 0.6580. On the 15-minute chart, price sweeps below the zone to 0.6572, then reverses. A market structure shift confirms on the 15-minute at 0.6590.
Entry at 0.6592. Stop below the sweep low at 0.6568 (24 pips). Target at the 4-hour supply zone at 0.6664 (72 pips). Account: $8,000. Risk: 1%.
The stop is anchored below the sweep low, where the market already cleared resting orders. The 24-pip distance determines the lot size (0.33 lots), not the other way around. If the stop had been placed arbitrarily at 15 pips, it would sit at 0.6577, inside the sweep zone, and likely get hit on a normal retracement.
Balancing Room to Breathe vs Risk Control
The tension in stop placement is always the same: tighter stops give better reward-to-risk ratios but get hit more often. Wider stops give the trade room but require smaller positions, which means smaller wins.
There is no universal answer. But here are two rules that help:
Rule 1: Your stop must be behind structure. If the nearest structural level is 35 pips away, your stop is at least 35 pips. Do not shrink it to 20 because you want a bigger position. That is reverse engineering your stop from your greed, and it will lose.
Rule 2: If the structural stop makes the trade too expensive, skip the trade. If 1% of your account cannot cover the stop distance at a reasonable lot size, the setup is not for you at your current account size. Do not over-leverage to make it work.
Position sizing is the release valve. A wider stop does not mean more risk. It means a smaller position. Your dollar risk stays constant. Only the lot size and pip distance change.
If you find that structural stops consistently lead to premature stop-outs, the problem is not the stop. It is the entry. You are entering too early, before the structure has confirmed. A better entry gives you a tighter structural stop naturally.
How EdgeFlo Calculates Size From Your Stop
The math behind structure-based stops is straightforward but tedious to do by hand on every trade. Divide your risk budget by the stop distance, convert to lots. Under pressure, most traders skip it or round incorrectly.
EdgeFlo's auto risk calculator does this step for you. Enter your stop level and your risk percentage, and the calculator outputs the correct lot size for the pair you are trading. The stop level comes from your structural analysis. The calculator handles the arithmetic.
This removes the temptation to manually increase your lot size when the stop is wide. The calculator enforces your risk rule mechanically, so you can focus on reading structure instead of crunching numbers.
Where should I place my stop-loss?
Why is a 20-pip stop-loss a bad idea?
How do I size my position based on my stop distance?
Should I move my stop-loss to breakeven?

Turn discipline on.
Every session.
EdgeFlo is the environment serious traders operate inside.
Start 7-Day Trial — $7
Cancel anytime.
No long-term commitment.


Think Different, Trade Different.