

Phase 1 vs Phase 2: Why Verification Is Easier
Phase 1 needs 10% profit. Phase 2 needs only 5%. Here is why passing phase 1 means you already have the skills to clear verification.

Phase 2 of a funded challenge is easier than phase 1. The profit target drops from 10% to 5%, and you already proved you can trade at the required level by passing the first phase. Most traders overthink verification when the math is actually on their side. Two solid wins at 3R can close it out entirely.
If you have been stressing about passing both phases of your prop firm challenge, this breakdown shows exactly why verification should feel lighter, not heavier.
TL;DR
Phase 1 requires a 10% profit target. Phase 2 requires only 5% (half the work).
If you passed phase 1 with 1% risk and 3R trades, you already have the exact skills for phase 2.
Phase 2 does not need the optional 2% risk acceleration. Stick to 1% risk the entire way.
Two consecutive 3R wins at 1% risk = 6% gain, which clears the 5% target.
Confidence from passing phase 1 is a real edge. Use it, but do not get reckless.
Phase 1: The 10% Target
Phase 1 is the hard part. You start with a $100,000 account (or whatever your challenge size is) and need to grow it by 10% while staying within drawdown limits. That means reaching $110,000 on a $100k account.
The framework is straightforward: risk 1% per trade, aim for a minimum 3R reward, and use the set and forget method on every position. Place your stop loss, place your take profit, and walk away. No partial profits, no moving stops to chase extra pips.
With a 40% to 50% win rate and 3R minimum, the math works. But the challenge is not really about math. It is about executing this plan when you are down 2% and your emotions are screaming at you to do something different.
Walkthrough: Phase 1 on a $100k Account
You start at $100,000 risking 1% per trade ($1,000 per trade). Your first trade wins at 3R, and your account jumps to $103,000. Your second trade loses, dropping you to $102,000. You win your third trade at 3R, climbing to $105,000.
At $105,000, you have the option to increase risk to 2% per trade to accelerate toward the 10% target. You take it. Your next trade wins at 3R: 2% times 3 = 6%. Your account hits $111,000. Challenge passed.
But what if that 2% trade loses instead? You drop to $103,000 and go back to 1% risk. You are still in the game, still above breakeven, and you just need a couple more wins to get back on track.
Here is the key rule for phase 1: if your balance drops to $98,000 (down 2%), cut your risk per trade from 1% to 0.5%. This prevents emotional spiraling. At 0.5% risk, it is nearly impossible to hit the maximum drawdown limit, and a single 3R win at 0.5% still gives you 1.5% back. Two wins at 0.5% and 3R gets you to breakeven, where you switch back to 1%.
The de-risk rule is not a sign of weakness. It is what keeps you in the challenge long enough for your edge to play out.
Phase 2: The 5% Verification
Phase 2 is the verification phase. Same rules as the challenge, same drawdown limits, but the profit target is cut in half. You only need 5% to pass.
On a $100,000 account, that means reaching $105,000. Compare that to the $110,000 you needed for phase 1. You have already done the harder version of this.
The other big difference: you do not need the optional 2% risk acceleration. In phase 1, bumping to 2% risk made sense because you had 10% to cover and wanted to close the gap faster once you had a profit buffer. In phase 2, the target is small enough that 1% risk per trade handles it comfortably.
Your phase 2 risk plan is simple:
Start at 1% risk per trade
If you drop to $98,000, reduce to 0.5% risk per trade
Stay at 1% risk all the way to $105,000
No 2% acceleration needed
Most two-phase challenges also give you unlimited time. There is no 30-day deadline forcing bad trades. You can take a day off, slow down your frequency, and wait for your best setups.
Why Phase 2 Feels Different
Phase 2 should feel easier, and for most traders it does. But not just because the target is lower.
The biggest advantage you carry into verification is confidence. You just passed phase 1. You survived drawdowns, stuck to your plan, and proved your edge over a meaningful sample of trades. That is real, earned confidence. Not the kind you get from watching a YouTube video.
This matters because confidence affects execution. When you trust your process, you take cleaner entries. You do not second-guess your stop placement. You do not panic-close a trade at 1R because you are afraid of a loss. Your win rate tends to hold or even improve because you are not sabotaging yourself.
Sound familiar? That cycle of doubt, hesitation, and bad fills that eats into your results? Phase 2 is the opposite. You have proof that your plan works. Now you just run it at half the target.
What Not to Do in Phase 2
Here is the mistake scenario. You pass phase 1 feeling invincible. You start phase 2 and think, "This is easy, I will just take more trades and finish in two days." You take three mediocre setups instead of waiting for your A+ structure. Two of them lose. You are down 2% on day one of verification.
Now you are at $98,000, your confidence is shaken, and you have to de-risk to 0.5%. The phase that should have been the easier half just became a grind because you got impatient. Overconfidence after phase 1 is the number one way traders make verification harder than it needs to be.
The fix is simple. Treat phase 2 with the same discipline you used in phase 1. Same plan, same risk, same patience. The only thing that changes is the finish line.
The Two-Win Scenario
This is where the math gets exciting. With 1% risk per trade and a minimum 3R target, look at what two wins in a row does to your phase 2 account.
Trade 1: You risk 1% ($1,000). The trade hits 3R. You gain 3% ($3,000). Account balance: $103,000.
Trade 2: You risk 1% ($1,000). The trade hits 3R. You gain another 3% ($3,000). Account balance: $106,000.
You just passed verification. Two trades. That is it.
Even if your first trade only hits 2R instead of 3R, you are at $102,000 after one win. Your second trade at 3R brings you to $105,000. Still passed.
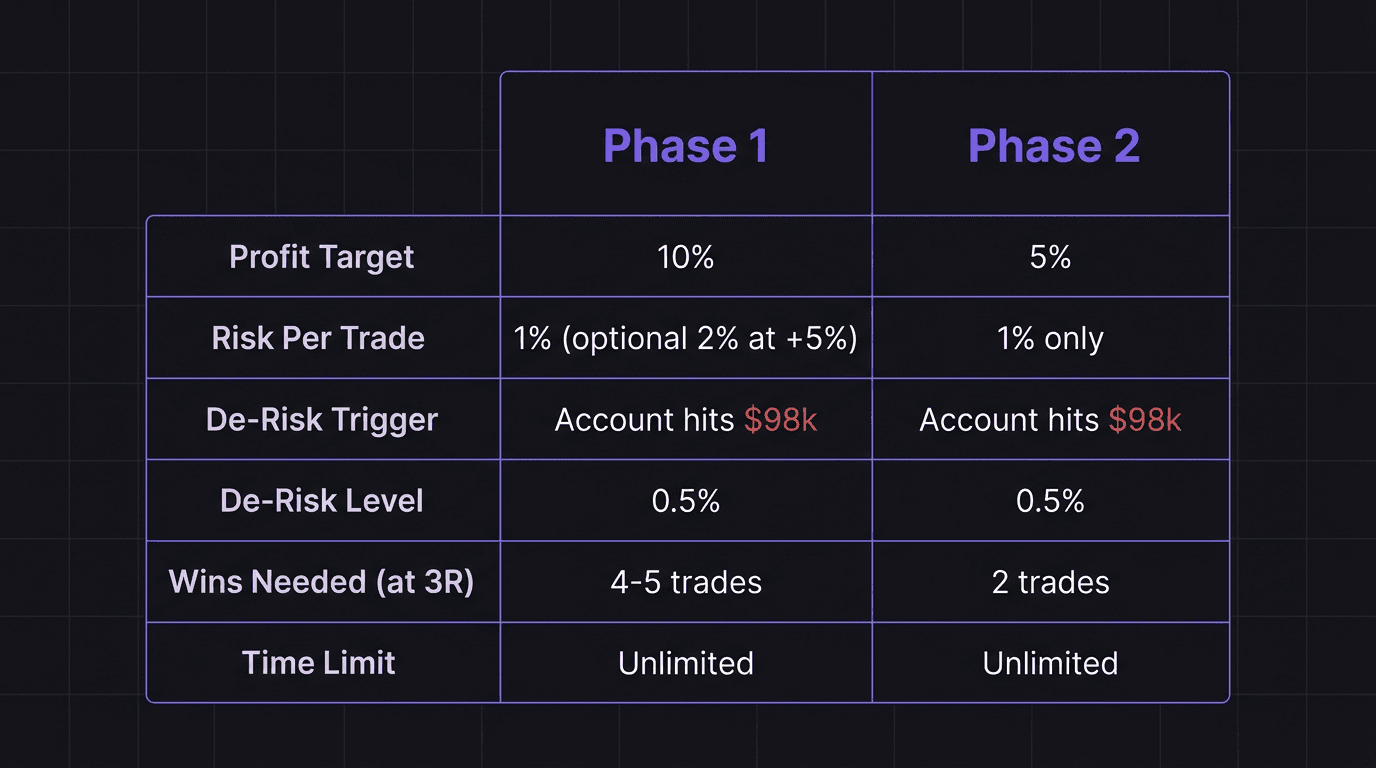
Compare that to phase 1, where you needed roughly 4 to 5 winning trades at 3R (assuming some losses mixed in) to cover the 10% target. Phase 2 cuts that in half, which means fewer opportunities for things to go wrong.
This is why the two-phase structure actually works in your favor. Phase 1 filters for skill and discipline. Phase 2 is just confirmation that you did not get lucky.
How EdgeFlo Tracks Both Phases
When you are in the middle of a challenge, tracking your progress against the profit target, your current risk tier, and your drawdown distance matters. Doing this manually works, but it adds one more thing to think about during a trading session when you should be focused on execution.
EdgeFlo's Edge plan builder lets you document your challenge phase rules (phase 1 target, phase 2 target, de-risk triggers) and keep them visible while you trade. You define your risk tiers, set your targets, and the plan stays next to your chart. After each trade, you self-report whether you followed the plan, which builds a real track record of phase progress over time.
If you are managing a funded account or working toward becoming a funded trader, having your challenge framework documented in one place removes the guesswork. You know exactly where you stand, which risk tier you should be on, and how many more wins you need.
What is the profit target for phase 1 of a funded challenge?
Is phase 2 easier than phase 1?
What risk should I use during phase 2?
Can you pass phase 2 with just two winning trades?

Turn discipline on.
Every session.
EdgeFlo is the environment serious traders operate inside.
Start 7-Day Trial — $7
Cancel anytime.
No long-term commitment.


Think Different, Trade Different.