

Edge, Equilibrium, or Extreme: Which Zone Entry Wins
Compare edge, equilibrium, and extreme zone entries for supply and demand trading. Learn how each affects your risk-reward and which to test first.

Every supply and demand zone gives you three entry options: edge, equilibrium, and extreme. Each one changes your stop distance, your fill rate, and your risk-to-reward profile. The right choice depends on your strategy, your pair, and your data, not on what feels comfortable.
Most traders default to whatever entry they learned first and never test the alternatives. That leaves money on the table. The only way to know which entry type works for your plan is to test all three over at least 100 trades and compare the numbers.
TL;DR
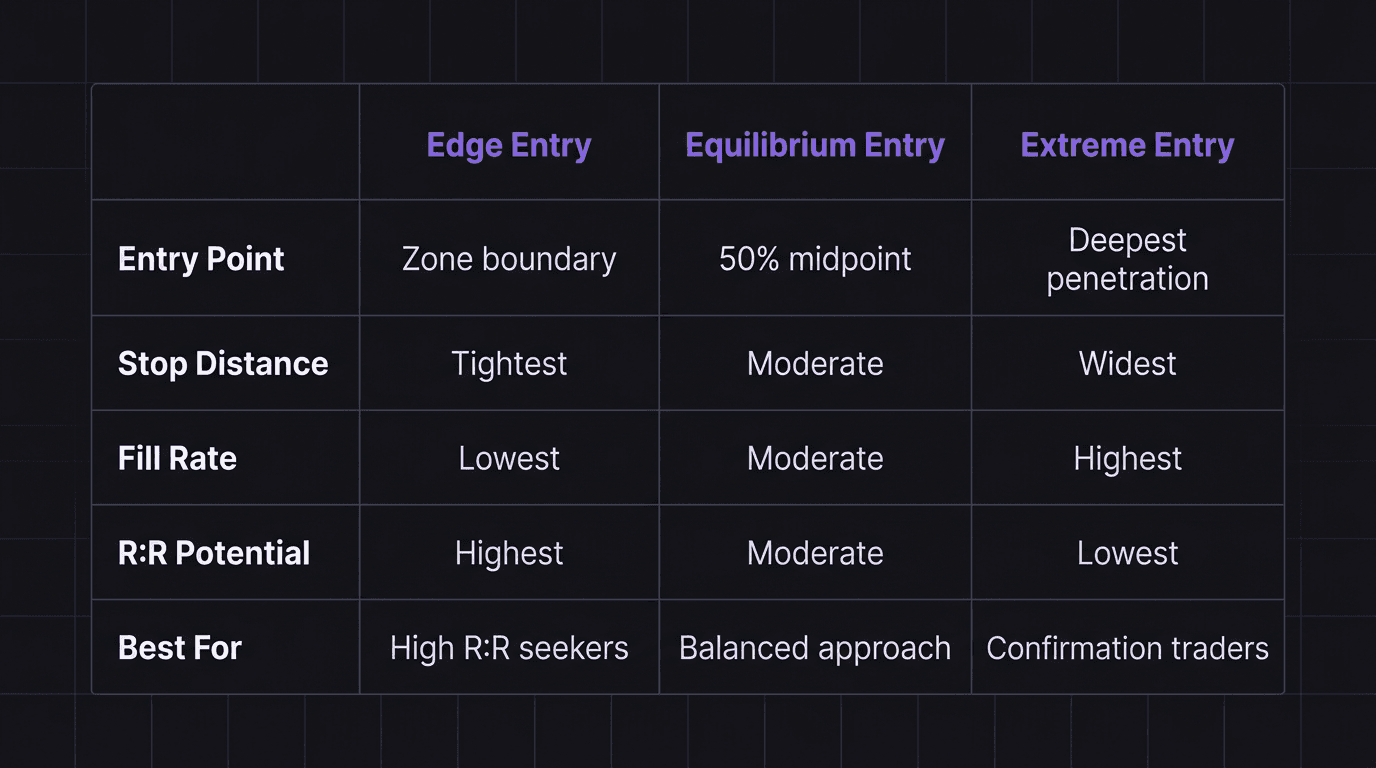
Edge entries sit at the zone boundary (first touch), giving the tightest stop and best R:R but lowest fill probability.
Equilibrium entries target the 50% midpoint of the zone, balancing fill rate with a moderate stop.
Extreme entries wait for price to push deepest into the zone, offering maximum confirmation but the widest stop.
Test each type independently over 100 trades to see which performs best with your specific strategy.
Do not pick based on preference. Pick based on what makes money.
Three Entry Types at Every Zone
When price approaches a supply or demand zone, you have a decision. Where exactly do you place your entry?
The zone is not a single price. It is a range between two levels. The top of a demand zone and the bottom of a demand zone might be 20 pips apart. Where you enter inside that range completely changes the math of the trade.
Edge: the first touch of the zone boundary. For a demand zone, this is the top of the zone. You are entering the moment price arrives.
Equilibrium: the 50% midpoint of the zone. You wait for price to push halfway through before entering.
Extreme: the deepest point, near the far boundary of the zone. For a demand zone, this is the bottom edge. You are waiting for maximum penetration before committing.
Each has trade-offs. None is universally superior. The winner depends on your strategy, the pair's volatility, and the quality of the zones you trade.
Edge Entries: First Touch, Tightest Stop
The edge entry triggers the moment price reaches your zone. You place a limit order at the zone boundary and let price come to you.
The advantage is stop distance. Your stop sits just below the zone (for demand) or just above (for supply), and because you entered at the very edge, the distance between entry and stop is as small as it gets. That means more R per pip of movement.
The disadvantage is fill rate. Price does not always reach the edge of a zone. Sometimes it reverses a few pips early. Sometimes it blows straight through without pausing. Edge entries get skipped more often than equilibrium or extreme entries.
Walkthrough: Edge Entry on a Demand Zone
You identify a demand zone on AUD/USD between 0.6520 and 0.6540. Your plan says to enter at the edge, which is 0.6540 (top of the demand zone). You place your stop at 0.6515, which is 5 pips below the zone bottom. Your target is the swing high at 0.6600.
Entry: 0.6540. Stop: 0.6515. Target: 0.6600.
Risk: 0.6540 minus 0.6515 = 25 pips. Reward: 0.6600 minus 0.6540 = 60 pips. R:R = 60 divided by 25 = 2.4R.
If price drops to 0.6530 and reverses without touching 0.6540, your order never fills. You missed the trade entirely. That is the cost of edge entries.
Equilibrium Entries: The 50% Midpoint
The equilibrium entry splits the difference. You wait for price to reach the midpoint of the zone before entering. For a demand zone spanning 0.6520 to 0.6540, the equilibrium is 0.6530.
This gives you a better fill rate than the edge (price is more likely to reach the midpoint than stop exactly at the boundary) while keeping a moderate stop distance. The R:R is lower than an edge entry because your entry is farther from the target, but you catch trades that the edge entry misses.
Many traders find the equilibrium is the sweet spot. It filters out weak zones (if price barely taps the edge and reverses, it probably was not a strong zone), while still giving a reasonable risk-to-reward ratio.
Using the same AUD/USD zone: entry at 0.6530, stop at 0.6515, target at 0.6600.
Risk: 0.6530 minus 0.6515 = 15 pips. Reward: 0.6600 minus 0.6530 = 70 pips. R:R = 70 divided by 15 = 4.67R.
Wait. That looks better than the edge entry. And it is, on the R:R math alone. But the catch is that when price pushes to the midpoint, there is a higher chance it pushes through entirely. The edge entry catches the early reversal. The equilibrium entry misses that and only catches the deeper push.
This is why you test. The R:R number alone does not determine profitability. Win rate matters equally.
Extreme Entries: Maximum Confirmation, Wider Stop
The extreme entry waits for price to push all the way through the zone to the far boundary. For a demand zone, you are entering near the bottom. This gives you maximum confirmation that price is actually reacting to the zone, not just passing through on its way lower.
The trade-off: your stop is now beyond the zone, and your entry is further from the target. The R:R suffers compared to edge and equilibrium entries.
But the win rate can be higher. By the time price reaches the extreme and reverses, you have strong evidence the zone is holding. You avoid the false starts where price dips into a zone and then blows right through.
Some traders combine the extreme entry with a structural confirmation. They wait for price to reach the extreme, then require a market shift or break of structure on the lower timeframe before entering. This adds a small amount of slippage (you are entering after the bounce starts) but dramatically increases the probability of a winning trade.
Walkthrough: Extreme Entry That Works (and One That Does Not)
Same AUD/USD zone (0.6520 to 0.6540). You wait for price to push to 0.6522 (near the zone extreme) and enter there. Stop at 0.6515, target at 0.6600.
Risk: 0.6522 minus 0.6515 = 7 pips. Reward: 0.6600 minus 0.6522 = 78 pips. R:R = 78 divided by 7 = 11.1R.
That R:R looks incredible. But here is the problem: how often does price reach 0.6522 and reverse cleanly? If the zone fails and price closes below 0.6515, your 7-pip stop gets hit fast. Over 100 trades, the extreme entry might win big but lose often.
Now the scenario that burns you: price drops to 0.6525, you hesitate, it drops to 0.6522 and you enter, then it drops through 0.6515 and your stop is hit. The extreme entry looked like confirmation, but the zone was already exhausted. Without backtesting data to validate zone quality, extreme entries can fool you.
The only way to know which entry works best is to isolate the variable and test it. Keep your zones the same, keep your stop placement the same, keep your targets the same. Change only the entry point. Run 100 trades with each method and compare the expectancy.
Expectancy is what matters, not R:R alone. A 2R setup that wins 60% of the time beats an 11R setup that wins 10%.
How EdgeFlo Tracks Entry Type Performance
EdgeFlo's journal lets you tag each trade with the entry type you used. Edge, equilibrium, extreme, or any custom tag you define. When you review your performance, you can filter by that tag and see the win rate, average R, and expectancy for each entry method independently.
Your mechanical trading plan should specify which entry type you are testing during each phase of your development. Document it in your plan, tag it in your journal, and let the data tell you what works.
Over time, this data becomes your proof. Not a feeling that "edge entries work better for me," but a number: "Edge entries on premium and discount demand zones during London session produced 1.8R expectancy over 120 trades." That is an edge you can trust.
What is the edge entry in supply and demand trading?
Which zone entry type has the best risk-to-reward?
How many trades do I need to test each entry type?
Can I use different entry types for supply and demand zones?

Turn discipline on.
Every session.
EdgeFlo is the environment serious traders operate inside.
Start 7-Day Trial — $7
Cancel anytime.
No long-term commitment.


Think Different, Trade Different.