

Order Block Entries: How to Trade Institutional Candles
Learn how to identify order blocks, qualify them with structure and liquidity, and enter when price returns. Step-by-step process for bullish and bearish setups.

An order block is the last candle before a strong move that breaks structure. It marks where institutional money entered the market. When price returns to that level, the same institutional interest often defends it. Knowing how to identify, qualify, and trade order blocks gives you entries with tight stops and clear invalidation points.
TL;DR
An order block is the last bearish candle before a bullish move (or the last bullish candle before a bearish move) that breaks market structure.
Valid order blocks require a break of structure on the move away and ideally a liquidity sweep or imbalance.
Enter when price returns to the order block zone, with your stop loss below (or above) the block.
The 50% level of the order block offers a balanced entry between fill rate and risk-to-reward.
Test your order block entries over 100 trades to see which entry style fits your plan.
What Is an Order Block
Picture a row of bearish candles pushing price lower. Then, suddenly, one large bullish candle appears and blasts through the most recent swing high. That last bearish candle before the explosive move? That is a bullish order block.
The logic is straightforward. Institutions cannot place massive orders all at once without moving the market against themselves. They accumulate positions quietly over several candles. The last candle before the move represents the final accumulation, the point where their buying overwhelmed all remaining sellers. When price eventually returns to that level, the same buyers have reason to defend their position.
Order blocks are a specific flavor of supply and demand zones. Not every demand zone is an order block, but every order block functions as a high-quality demand or supply zone. The difference is the structural break. A regular demand zone might form during a range. An order block forms right before price aggressively shifts direction.
Bullish vs Bearish Order Blocks
A bullish order block is the last bearish (red/down) candle before a strong bullish move that creates a break of structure to the upside. You mark the entire body of that candle (open to close) as your zone. When price pulls back to this zone, you look for buy entries.
A bearish order block is the last bullish (green/up) candle before a strong bearish move that breaks structure to the downside. Same concept, mirrored. When price rallies back to this zone, you look for sell entries.
The key in both cases: the move away from the candle must break market structure. If the move does not break a swing high or swing low, you do not have an order block. You have a regular candle in a range.
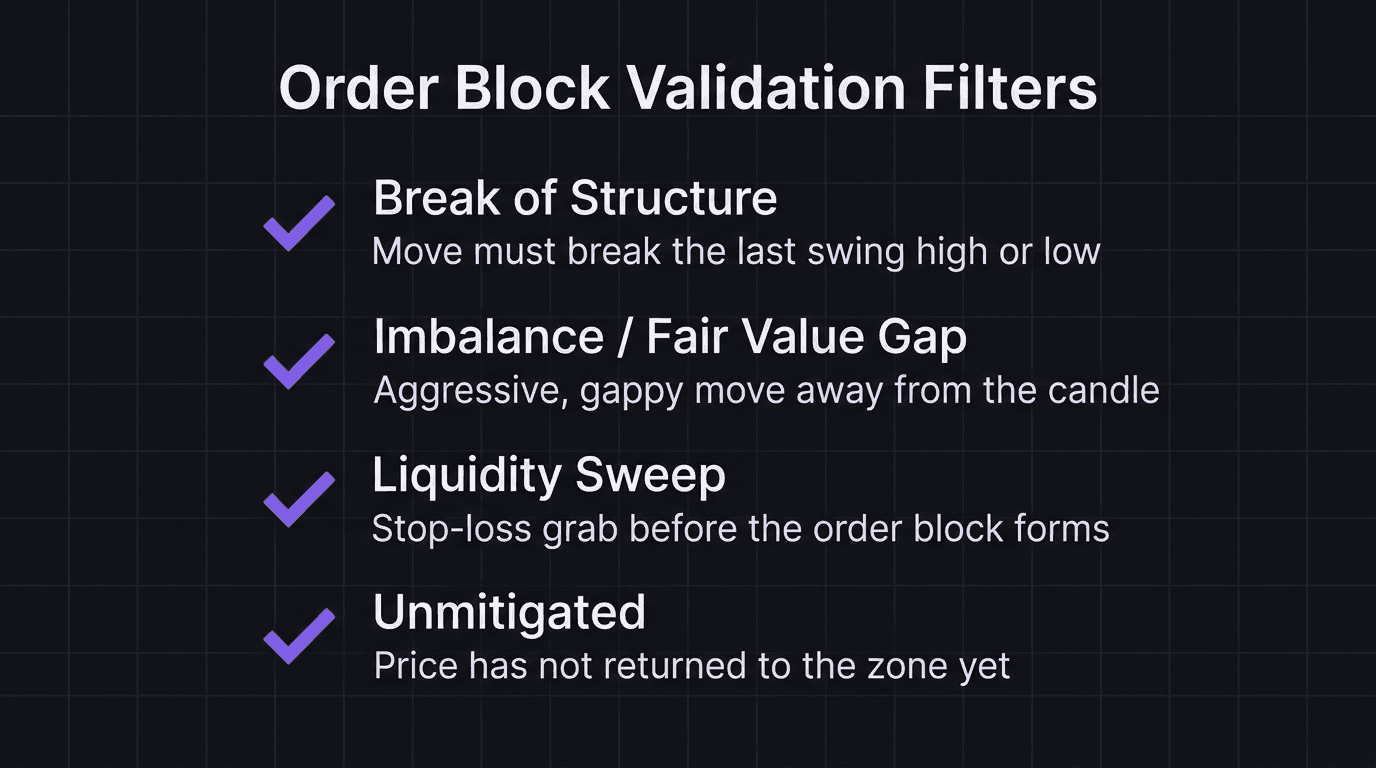
How to Identify a Valid Order Block
Not every candle before a move is worth trading. Most order blocks on a chart are noise. You need filters to separate the ones that hold from the ones that get run through.
Filter 1: Break of Structure The move away from the order block must break the most recent swing point. A bullish order block must lead to a break above the last swing high. No break, no order block.
Filter 2: Imbalance on the Move After price leaves the order block, look for an imbalance (also called a fair value gap). This is a gap between candle bodies that shows aggressive, one-sided momentum. If the move away is clean and gappy, institutions drove it. If the move is choppy and overlapping, the conviction is weaker.
Filter 3: Liquidity Sweep The best order blocks form after a liquidity sweep. Price dips below a swing low (grabbing stop losses), and then the order block candle forms as buyers step in aggressively. This sweep-then-reverse pattern means weak hands already got cleared out and fresh institutional money is entering.
Filter 4: Unmitigated An order block is only tradable if price has not returned to it yet. Once price comes back and fills through the zone, the block is "mitigated" (used up). Trading a mitigated order block is like buying a used lottery ticket.
Bullish vs Bearish Order Blocks
The mechanics are identical, just mirrored. But recognizing each one in real time requires practice, so here is exactly what to look for.
Bullish Order Block in Practice
Walkthrough: EUR/USD Bullish Order Block
On the 1-hour chart, EUR/USD has been making lower highs and lower lows. Price drops to 1.0820 and sweeps the liquidity below equal lows at 1.0825. The final bearish candle closes at 1.0822 (open at 1.0840, close at 1.0822). Then a large bullish candle rockets up, breaking the last swing high at 1.0870 and closing at 1.0890.
The order block is the bearish candle with the body from 1.0840 (open) to 1.0822 (close). Price leaves an imbalance between 1.0860 and 1.0875. All four filters pass: structure broke, imbalance exists, liquidity was swept, and the block is unmitigated.
You wait for price to pull back to the order block zone (1.0822 to 1.0840). Price returns and taps 1.0831 (the 50% level). You enter long at 1.0831 with a stop loss at 1.0818 (below the block, 13 pips risk). Your target is the recent high at 1.0890 (59 pips).
Math check: 1 standard lot on EUR/USD = $10/pip. 13 pips risk = $130 risk. 59 pips target = $590 target. $590 / $130 = 4.54R.
Bearish Order Block in Practice
Walkthrough: GBP/USD Bearish Order Block
On the 4-hour chart, GBP/USD has been trending up. Price reaches 1.2780 and sweeps above equal highs at 1.2775. The final bullish candle opens at 1.2755 and closes at 1.2780. Then a massive bearish candle drops, breaking the last swing low at 1.2700 and closing at 1.2680.
The order block is the bullish candle with the body from 1.2755 (open) to 1.2780 (close). All filters pass. You wait for price to rally back to the zone.
Price returns and reaches 1.2768 (the equilibrium of the block). You enter short at 1.2768 with a stop loss at 1.2785 (above the block, 17 pips risk). Your target is the recent low at 1.2680 (88 pips).
Math check: 1 standard lot on GBP/USD = $10/pip. 17 pips risk = $170 risk. 88 pips target = $880 target. $880 / $170 = 5.18R.
Both setups offer strong risk-to-reward because the order block gives you a tight zone to trade from. That is the advantage: clear invalidation and a defined stop level.
Order Block Entries: The Step-by-Step Process
Here is the exact sequence from chart open to trade entry:
Step 1: Identify the trend on the higher timeframe. If the daily is bullish, you are looking for bullish order blocks on the 1-hour or 15-minute. Do not trade against the higher-timeframe direction.
Step 2: Find the most recent break of structure. Scan for the candle that preceded the structural break. Mark the body of that candle as your order block zone.
Step 3: Run the four filters. Break of structure, imbalance, liquidity sweep (ideal but not required every time), and unmitigated status. If at least three out of four pass, the block is tradable.
Edge entry: Place a limit order at the top of a bullish order block (or bottom of a bearish one). Tightest stop, highest fill rate, lowest R-multiple.
Equilibrium entry: Place a limit at the 50% level of the block. Balanced between fill rate and R-multiple.
Extreme entry: Place a limit at the bottom of a bullish block (or top of a bearish one). Widest stop, lowest fill rate, highest R-multiple.
Step 5: Set your stop loss. Place it a few pips beyond the opposite end of the order block. For a bullish block, the stop goes below the candle low. For a bearish block, above the candle high.
Step 6: Set your take profit. Target the opposing swing point, the next supply zone (for longs), or the next demand zone (for shorts).
Step 7: Document and review. Log the entry type you used, whether the block held, and what your R-multiple was. After 100 trades, you will know which entry style works best for your specific strategy.
The process stays the same every time. That is what makes it mechanical. No guessing, no "feeling" the market. Just structure, zones, and a defined entry model.
How EdgeFlo Documents Order Block Rules in Your Plan
Knowing the process is one thing. Following it consistently is another.
EdgeFlo's Edge plan builder (available on Plus) lets you write down your exact order block entry criteria: which filters you require, which entry type you use, and where your stop and target go. Your plan stays visible while you trade, so you are not relying on memory at the moment of execution.
After each trade, EdgeFlo's journal captures the result. Over time, you build a dataset that shows whether your order block entries are actually performing or whether you need to adjust your filters. That data replaces opinion with proof.
Most traders who struggle with order blocks are not bad at identifying them. They are inconsistent in how they trade them. One day they use the edge entry, the next day the extreme, the next day they skip the filters entirely. A documented plan eliminates that drift.
What is an order block in trading?
How do you confirm an order block is valid?
What is the difference between an order block and a supply or demand zone?
Should I enter at the edge or the 50% level of an order block?

Turn discipline on.
Every session.
EdgeFlo is the environment serious traders operate inside.
Start 7-Day Trial — $7
Cancel anytime.
No long-term commitment.


Think Different, Trade Different.