

Market Mechanics Learning Path: The Right Order
Learn market mechanics in the right order: structure first, then points of interest, then liquidity, then entry. Skipping steps causes confusion and bad trades.

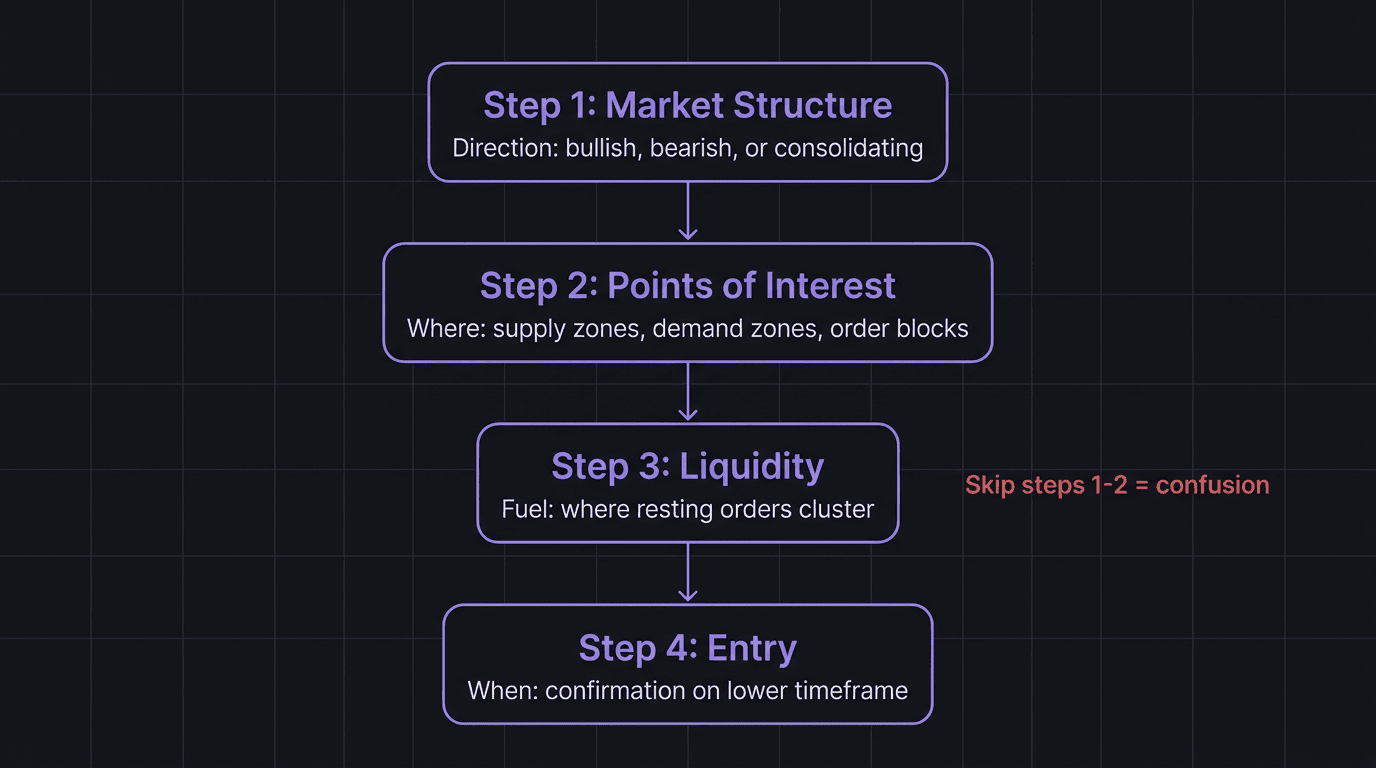
Market mechanics has a correct learning order: market structure first, then points of interest, then liquidity, then entry. Skipping any step in this sequence leads to confusion, premature entries, and the frustrating feeling that "nothing works." If you have ever stared at a chart covered in zones, levels, and concepts but still had no idea what to do, you probably learned the steps out of order.
Step 1: Market structure tells you the direction (bullish, bearish, or consolidating).
Step 2: Points of interest (supply/demand zones, order blocks) tell you where to look for entries.
Step 3: Liquidity concepts refine your zones and show you where orders cluster.
Step 4: Your entry model is the final decision, triggered only after the first three steps are done.
Skipping to Step 3 or 4 without mastering 1 and 2 is why most beginners fail with advanced concepts.
Step 1: Market Structure Tells You Direction
Before you look for a trade, you need to know where the market is going. That is what market structure gives you: direction.
A bullish market structure shows higher highs and higher lows. Price is pushing up, and each pullback stays above the last low. A bearish structure shows lower highs and lower lows. Price is pushing down, and each bounce fails below the last high.
This sounds basic. It is basic. But most traders skip past it too quickly because it feels "too simple." Then they spend weeks trying to figure out why their demand zone entries keep failing. The answer is usually that they were buying in a bearish structure or selling in a bullish one.
Break of structure is the transition point. When a bullish market makes a lower low, the structure shifts. When a bearish market makes a higher high, the structure shifts. These transitions are the most important moments on any chart because they redefine the direction for everything that follows.
Walkthrough: Structure first saves a bad trade. EUR/USD on the 4H chart shows a clear bearish structure: lower highs at 1.0920, 1.0890, and 1.0860. A beginner trader ignores structure and sees a demand zone at 1.0800 from a previous bounce. They buy at 1.0805, expecting a reversal. Price bounces 20 pips to 1.0825 and then continues falling to 1.0750. The demand zone "worked" for a brief bounce, but the bearish structure was intact. The trend continued. If the trader had checked structure first, they would have known that buying in a down trend has the odds stacked against them.
Step 2: Points of Interest Tell You Where
Once you know the direction, you need to know where to look for entries. Points of interest are specific zones on the chart where institutional orders previously entered the market. The two most common are supply and demand zones and order blocks.
A demand zone is an area where buyers previously overwhelmed sellers, creating a sharp move upward. When price returns to that zone, those same buyers may still have unfilled orders. This makes it a high-probability area for price to bounce.
A supply zone is the opposite: an area where sellers previously overwhelmed buyers. When price returns, the zone acts as resistance.
The key is specificity. You are not looking at a vague "support area." You are identifying the exact candle (or candle range) that initiated the move. This precision is what separates a point of interest from a traditional support/resistance level.
Without Step 1 (structure), points of interest are useless. A demand zone in a bearish structure gets run through. A supply zone in a bullish structure gets broken. The direction filters which zones matter.
Step 3: Liquidity Tells You Fuel
This is where many traders jump ahead and get burned. Liquidity concepts are powerful, but they are a refinement layer, not a foundation.
Liquidity tells you where resting orders sit: above swing highs, below swing lows, at equal levels. It tells you which pools the market is likely to target next. And it tells you whether your point of interest has been "fueled" (liquidity swept nearby) or whether the pool above it still needs to be taken first.
Structure tells you the direction (bullish).
The demand zone at 1.0800 tells you where to look for longs.
Liquidity below 1.0790 (equal lows from two previous touches) tells you that price might sweep that pool before bouncing from the zone.
That third layer changes your entry from "buy at 1.0800" to "wait for the sweep below 1.0790, then buy." It is a refinement, not a replacement.
Walkthrough: Liquidity as the missing layer. A trader identifies bullish structure on GBP/USD 4H and marks a demand zone at 1.2650. They set a limit buy at 1.2655. Price drops to 1.2660 and reverses, missing their entry by 5 pips. They are confused. But if they had checked liquidity, they would have noticed equal lows at 1.2640. Smart money might sweep those lows before reversing. So instead of a limit buy at 1.2655, they set an alert at 1.2640 and wait. Price sweeps to 1.2635, they enter at 1.2640 after confirmation, and ride the reversal to 1.2750. Same zone. Better entry timing. Liquidity was the difference.
Step 4: Entry Is the Last Decision
Your entry model, the specific candle pattern, timeframe confirmation, or price action trigger you use to pull the trigger, is the final piece. Not the first.
Most traders start here. They learn a candlestick pattern (pin bar, engulfing candle) and try to trade it everywhere. Without direction, location, and fuel, these patterns are meaningless. A pin bar in the middle of nowhere is just a candle. A pin bar at a demand zone in a discount area after a liquidity sweep is a high-probability entry.
Structure = the foundation
Points of interest = the walls
Liquidity = the wiring and plumbing
Entry = the front door
You cannot install a front door without walls. You cannot build walls without a foundation. And yet most traders try to install the front door on bare ground and wonder why the house falls down.
The practical takeaway: if you ever feel overwhelmed or confused at the chart, strip everything back to Step 1. Where is the structure? What direction is price heading? Start there. Then move forward through the steps. Build your mechanical trading plan around this exact sequence.
How EdgeFlo Keeps Your Process Visible
The biggest risk with a multi-step process is skipping steps under pressure. When a chart is moving fast and you feel the trade slipping away, the temptation is to jump straight to the entry without confirming structure, zone, or liquidity.
EdgeFlo's Edge plan builder lets you document this exact four-step process as your active trading plan. You write out each step: structure check, point of interest identified, liquidity status, entry trigger. The plan sits next to your chart during live trading, so the sequence stays visible when your impulse says "just enter now."
After each trade, the post-trade self-report in Edge lets you mark which steps you actually followed. Over time, you build data on whether you are skipping steps, and which skipped steps correlate with losing trades. That kind of structured self-reporting turns a learning path into a measurable discipline system.
What order should I learn market mechanics?
Can I learn liquidity before market structure?
What are points of interest in trading?
Why do beginner traders get overwhelmed by market mechanics?

Turn discipline on.
Every session.
EdgeFlo is the environment serious traders operate inside.
Start 7-Day Trial — $7
Cancel anytime.
No long-term commitment.


Think Different, Trade Different.