

The Golden Bullet Strategy: Liquidity Sweep to Confirmed Entry
The Golden Bullet is a 5-step trading framework: identify trend, locate liquidity, wait for the session, let price sweep, confirm with a V-shape and BOS, then enter.

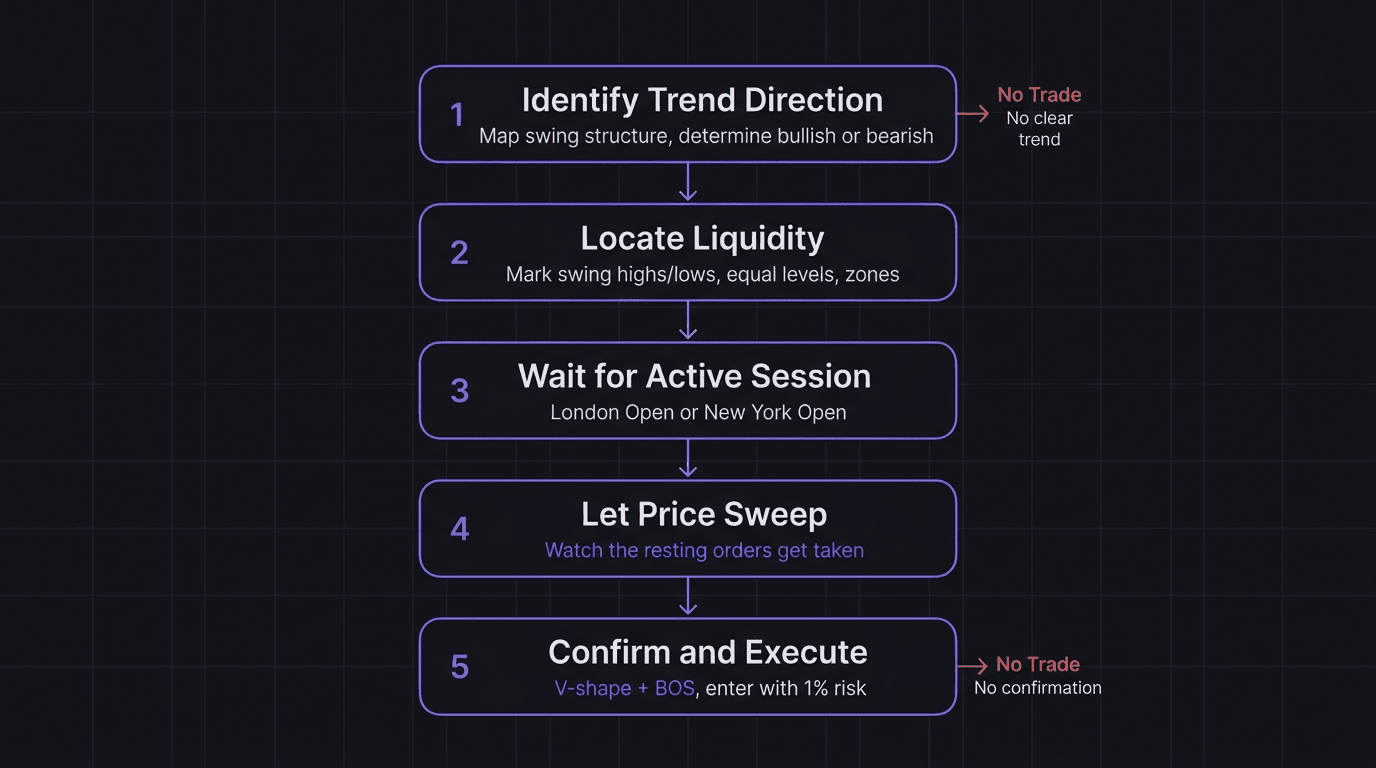
The Golden Bullet strategy combines liquidity and timing into a five-step entry process: identify the trend direction and structure, locate where liquidity sits, wait for an active session (London or New York), let price sweep the available liquidity, then confirm the move with a V-shaped reaction and break of internal structure before executing with defined risk. Each step eliminates a category of bad trades, and skipping any one of them turns a high-probability setup into a gamble.
TL;DR
Step 1: Read the market structure to determine if the trend is bullish or bearish. No bias, no trade.
Step 2: Mark where resting orders (liquidity) sit above swing highs or below swing lows.
Step 3: Wait for London Open or New York Open. No institutional participation, no ignition.
Steps 4 and 5: Let price sweep the liquidity, watch for a V-shaped reaction and a break of structure confirming the pullback is over, then enter with 1% risk.
The strategy works because it combines three independent confirmations: direction, fuel, and timing.
Step 1: Identify Trend Direction and Structure
Before you look at entries, you need to know who controls the market. Open the higher timeframe (4-hour or daily) and map the swing structure.
Bullish structure: higher highs and higher lows. You are looking for longs. Bearish structure: lower highs and lower lows. You are looking for shorts. If structure is unclear (price chopping sideways with no clean HH/HL or LH/LL sequence), you have no trade. Sit out.
Mark the most recent swing high and swing low. These become your boundaries. In a bearish trend, the last swing high is your invalidation level. If price breaks above it, the bearish thesis is dead and you stop looking for shorts.
This step takes 2 minutes. But it eliminates every trade that fights the trend. Most traders who lose consistently are trading against structure because they never established a clear directional bias before dropping to the entry timeframe.
Step 2: Locate Where Liquidity Sits
Now that you know the direction, ask: where does price need to go to grab fuel before continuing?
In a bearish trend, price needs to create a lower high. To do that, it pulls back upward. That pullback targets liquidity above internal swing highs, above equal highs, or above consolidation ranges. Mark every visible cluster of resting buy stops.
In a bullish trend, price needs to create a higher low. The pullback drops into liquidity pools below internal swing lows, below equal lows, or below consolidation ranges. Mark every visible cluster of resting sell stops.
Also mark the supply or demand zones near those liquidity levels. The extreme zone (the zone that caused the most recent break of structure) is your highest-probability point of interest. If liquidity sits near the extreme zone, that location has both fuel and institutional interest. That confluence makes it an A-grade setup.
Walkthrough: Mapping Liquidity in a Bearish EUR/USD Trend
The 4-hour chart shows EUR/USD in a downtrend. The last break of structure occurred when price dropped below 1.0880, creating a new lower low. The swing high for this move is 1.0935. The extreme supply zone (the candle cluster that initiated the break below 1.0880) sits between 1.0920 and 1.0935.
You mark three internal swing highs on the 15-minute chart: 1.0895, 1.0908, and 1.0920. Above each one, buy stops sit from short sellers and breakout traders. The densest cluster is above 1.0920 because it overlaps with the extreme supply zone and the 4-hour swing high. This is your primary target zone.
No math here because we have not entered a trade yet. This is the planning phase. The mapping is done before the session opens, ideally during the Asian session or an hour before London.
Step 3: Wait for the Active Session
You have your direction. You have your liquidity map. Now you wait.
This is where most traders fail. They finish their analysis at 1:00 AM EST and feel compelled to trade immediately. But without institutional participation, liquidity just sits there. Price chops around the Asian range, and your early entry gets stopped out by noise.
The kill zones are London Open (3:00 to 6:00 AM EST), the London/New York overlap (8:00 to 11:00 AM EST), and the New York session (8:00 AM EST onward). These are the only windows where institutional money actively sweeps liquidity and creates the moves you want to trade.
Waiting does not mean staring at the chart for 4 hours. It means completing your markup, setting alerts near your key levels, and stepping away until the session opens. When you return, you check whether price is approaching your marked liquidity zones. If yes, you shift into execution mode. If not, you wait longer.
The hard part is genuinely doing nothing. Your analysis is done. Your levels are marked. The only task left is patience.
Steps 4 and 5: Sweep, React, Execute
This is where the trade happens. You are watching the session open. Price approaches one of your marked liquidity zones.
Step 4: Let price sweep the available liquidity. Price pushes into the swing high above 1.0920 (in our bearish example) and triggers the resting buy stops. You do not enter yet. The sweep is not the entry signal. It is the fuel loading.
Step 5: Wait for the reaction and confirmation. Two things must happen:
First, a V-shaped reaction. Price hits the liquidity zone, sweeps through, and immediately reverses with momentum. A strong bearish candle closes back below the swept level. This tells you that institutions used the buy stop liquidity to fill their sell orders. The sweep was valid.
Second, a break of internal structure. The internal structure during the pullback was bullish (higher highs and higher lows facilitating the retrace). After the V-shaped reaction, price needs to break below the last internal higher low. That break confirms the pullback is over and the bearish trend is resuming.
When both confirmations appear, you execute the sell order with defined risk, typically 1% of your account.
Walkthrough: Full Golden Bullet Execution on EUR/USD
Setup from our earlier mapping. Trend is bearish. Extreme supply zone sits at 1.0920 to 1.0935. Liquidity above 1.0920 is marked. Internal higher low during the pullback is at 1.0888.
London opens at 3:00 AM EST. Price pushes up from 1.0900 to 1.0928, sweeping above 1.0920 and into the extreme supply zone. At 3:15 AM, a strong bearish engulfing candle closes at 1.0905, creating a V-shaped reaction. Price then drops to 1.0882 by 3:35 AM, breaking below the internal higher low at 1.0888. Confirmation achieved.
You enter short at 1.0885 with a stop at 1.0932 (above the sweep high). Target is the previous lower low at 1.0820.
Price reaches 1.0820 by the London/New York overlap. 65 pips captured at 1.38R. The entry worked because all five steps aligned: bearish structure, liquidity mapped, active session, sweep confirmed with V-shape, and break of internal structure.
That R multiple is modest. Some Golden Bullet setups produce 3R or higher when the stop can be tightened closer to the sweep level. The R is a function of the stop distance and the available structure target, not a fixed number. What matters is the process, not forcing a target.
How EdgeFlo Enforces the Golden Bullet Process
The Golden Bullet strategy is a mechanical trading plan. Every step is defined. The challenge is following every step on every trade, especially step 3 (waiting for the session) and step 5 (waiting for confirmation after the sweep).
EdgeFlo's guardrails enforce risk percentage per trade. You set 1% as your maximum, and the platform calculates your lot size automatically based on your stop distance. That removes the temptation to size up on a "perfect" setup or to widen your stop after entry.
The trading windows feature enforces step 3. If you set your window to 3:00 to 6:00 AM EST, the trade button is greyed out before and after. You can override, but the override is a conscious choice, not a habit.
After each trade, the journal captures the session, the entry reason, and the outcome. Over 30 trades, you can filter by "sweep entries during London" versus "early entries during Asian session" and see the data that proves the timing step matters. That data makes discipline easier because you are not fighting willpower anymore. You are following proof.
What is the Golden Bullet strategy in trading?
Why do you need both a V-shaped reaction and a break of structure?
Which session should I trade the Golden Bullet strategy in?
How much should I risk per Golden Bullet trade?

Turn discipline on.
Every session.
EdgeFlo is the environment serious traders operate inside.
Start 7-Day Trial — $7
Cancel anytime.
No long-term commitment.


Think Different, Trade Different.