

The Buffer Strategy for Passing Funded Challenges
Learn the 1% to 0.5% buffer strategy for passing funded challenges. Includes a full $100K walkthrough with best and worst case math.

The buffer strategy is a risk management framework built specifically for funded challenges. You risk 1% per trade when your account is above the starting balance, drop to 0.5% per trade after a 2% drawdown, and scale back to 1% only after recovering. This approach works because it protects your account during losing streaks (which will happen) while preserving enough room to hit the profit target when your wins come.
Standard "always risk 1%" advice does not account for the unique pressure of funded challenges. You have a maximum loss limit of 10%, a daily loss limit of 5%, and a profit target of 10% in phase one. One bad week at 1% risk can put you in a hole that is nearly impossible to climb out of. The buffer strategy prevents that by adapting your risk to your account state.
TL;DR
Risk 1% per trade when your balance is at or above starting capital.
After a 2% drawdown, reduce risk to 0.5% per trade until you recover to the starting balance.
This doubles your survival runway during losing streaks without requiring a higher win rate.
You only need a 30% to 40% win rate with a 1:3 minimum reward-to-risk ratio.
Once you build a 5% profit buffer, you can optionally increase risk to 2% to close out the challenge faster.
Why Standard Risk Rules Are Not Enough for Challenges
On a personal live account, risking 1% per trade is standard advice. If you lose 10 trades in a row, you are down 10%. Painful, but survivable. You can take a break, regroup, and trade your way back over weeks or months.
On a funded challenge, losing 10% means you are out. Challenge failed. Fee lost. Start over.
That changes everything. The math is the same, but the consequences are completely different. On your own account, a 10% drawdown is a bad month. On a funded challenge, it is game over.
Here is the problem with flat 1% risk on a $100,000 challenge:
Maximum loss limit: $10,000 (10%)
Risk per trade at 1%: $1,000
Number of consecutive losses before failure: 10 trades
Ten trades sounds like a lot, but a 30% win rate strategy can easily produce 5 to 7 losing trades in a row. Add a couple of partial losses and you are at 8 to 9. One more bad setup and you have failed the challenge.
The buffer zone concept exists precisely for this reason. You need a risk approach that gives you more bullets during drawdowns and more firepower when you are ahead.
The Buffer Strategy Explained
The rules are simple. Execution is what separates traders who pass from traders who fail.
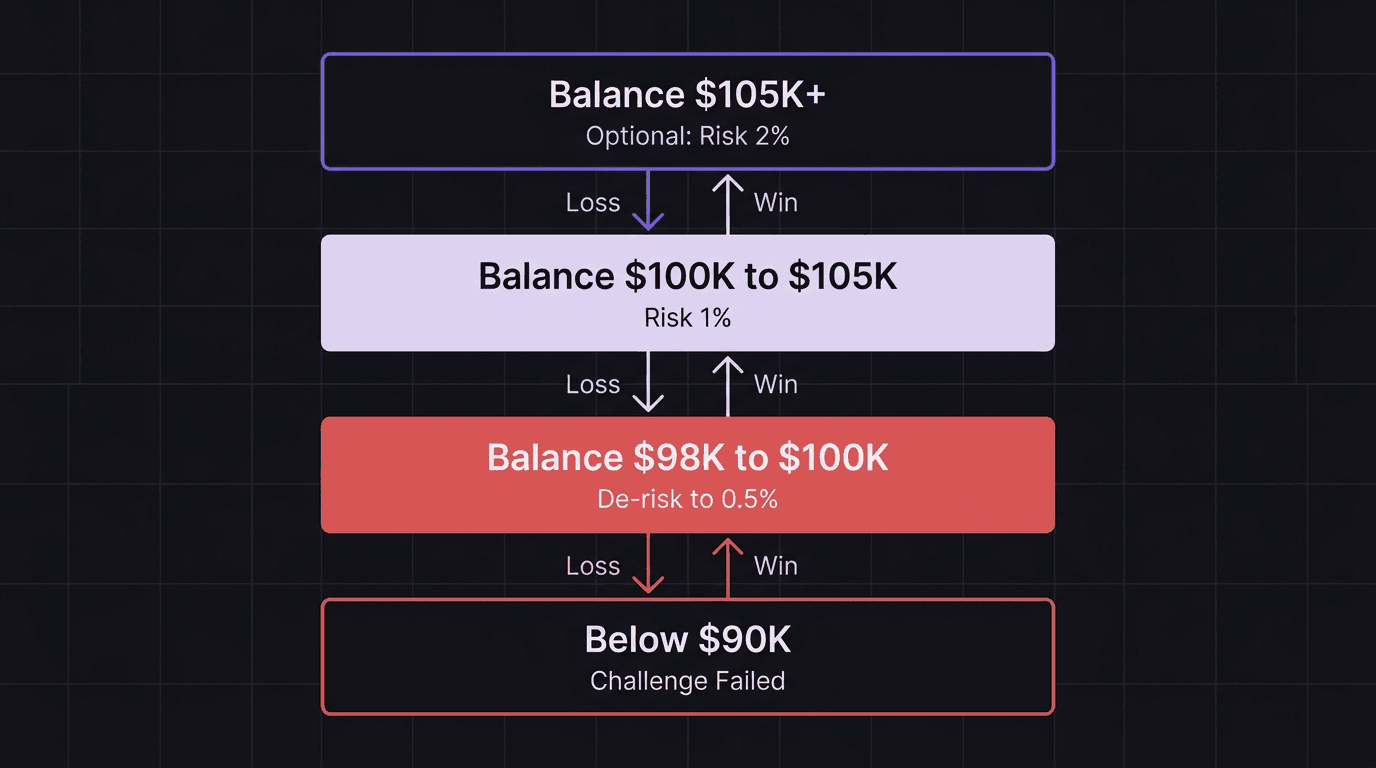
Rule 1: Risk 1% per trade while your balance is at or above $100,000.
At 1% risk with a 1:3 reward-to-risk ratio, each win returns 3%. Each loss costs 1%. This is your standard operating mode.
Rule 2: After your balance drops to $98,000 (2% drawdown), reduce risk to 0.5% per trade.
Now each loss costs $500 instead of $1,000. Your survival runway just doubled. From $98,000 to the $90,000 failure line, you have room for 16 more losses at 0.5% instead of 8 at 1%. That is 16 more chances to catch a winning trade.
Rule 3: Stay at 0.5% risk until your balance recovers back to $100,000.
Do not increase risk during the recovery phase. The goal here is survival, not speed. At 0.5% risk with a 1:3 ratio, each win returns 1.5%. Two wins get you from $98,000 back to roughly $101,000.
Rule 4: Once you build a 5% profit buffer ($105,000), you may optionally increase risk to 2%.
This is aggressive and completely optional. At 2% risk with a 1:3 ratio, one winning trade returns 6%. From a $105,000 balance, one win at 2% takes you to $111,000, which passes the 10% profit target.
Your risk per trade is never static in a challenge. It adapts to your account state.
Walkthrough: Passing a $100K Challenge
Here is a realistic scenario using the buffer strategy with a 33% win rate and a 1:3 reward-to-risk minimum.
Trade 1: Risk 1% ($1,000). Loss. Balance: $99,000.
Trade 2: Risk 1% ($990). Loss. Balance: $98,010.
Balance dropped below $98,000 threshold. Switch to 0.5% risk.
Trade 3: Risk 0.5% ($490). Loss. Balance: $97,520.
Trade 4: Risk 0.5% ($488). Win at 3:1. Gain: $1,464. Balance: $98,984.
Trade 5: Risk 0.5% ($495). Win at 3:1. Gain: $1,485. Balance: $100,469.
Balance recovered above $100,000. Switch back to 1% risk.
Trade 6: Risk 1% ($1,005). Loss. Balance: $99,464.
Trade 7: Risk 1% ($995). Win at 3:1. Gain: $2,985. Balance: $102,449.
Trade 8: Risk 1% ($1,024). Win at 3:1. Gain: $3,072. Balance: $105,521.
Balance crossed $105,000. Optional: increase to 2% risk.
Trade 9: Risk 2% ($2,110). Win at 3:1. Gain: $6,330. Balance: $111,851.
Profit target of $110,000 reached. Challenge passed.
Nine trades. Four losses, five wins. The win rate in this scenario was 55%, but notice that the strategy would still work at lower win rates because the 0.5% de-risk phase preserves capital during the losing streak at the start.
Worst Case Walkthrough
What if the losses keep coming?
Trades 1 through 4: Four consecutive losses at 1% for the first two, then 0.5% for the next two. Balance: $97,520 (same as above through Trade 3, then one more loss at 0.5%).
Actually, let's trace it more carefully.
Trade 1: Risk 1% ($1,000). Loss. Balance: $99,000. Trade 2: Risk 1% ($990). Loss. Balance: $98,010. Switch to 0.5%. Trade 3: Risk 0.5% ($490). Loss. Balance: $97,520. Trade 4: Risk 0.5% ($488). Loss. Balance: $97,032. Trade 5: Risk 0.5% ($485). Loss. Balance: $96,547. Trade 6: Risk 0.5% ($483). Loss. Balance: $96,064.
Six consecutive losses. Balance: $96,064. Still $6,064 above the $90,000 failure line. You have room for roughly 12 more losses at 0.5% before failing.
Compare that to flat 1% risk: six consecutive losses would put you at $94,148, with only 4 more trades of runway. The buffer strategy literally triples your survival margin during the worst stretches.
Now, one single win at 0.5% risk with a 1:3 ratio recovers $1,440 (roughly 1.5% of balance). Two wins recover you back near $99,000. Three wins at the post-recovery 1% risk push you past $100,000 and into profit territory.
Drawdown recovery is a math problem, and the buffer strategy solves it by keeping you alive long enough for your edge to show up.
When to Scale Risk Back Up
The trigger points are clear:
Below $98,000: Stay at 0.5% until you recover to $100,000. No exceptions. Do not increase risk because you "feel" like the next trade will win. Your feelings are not data.
$100,000 to $105,000: Return to 1% risk. You are back in standard mode. Focus on clean setups and let the 1:3 ratio do the work.
Above $105,000: Optional increase to 2%. This accelerates the final push to the 10% profit target, but it also means a single loss costs 2%. Only do this if your recent performance justifies it. If you just came off a losing streak and barely recovered to $105,000, stay at 1%. The extra days are worth the safety.
The verification phase (phase two) typically requires only 5% profit instead of 10%, using the same rules. At 1% risk with a 1:3 ratio, two winning trades get you there. The buffer strategy makes phase two almost mechanical if you can control your position sizing.
One more thing: respect the daily loss limit. On most challenges, the daily limit is 5% ($5,000 on a $100K account). Even at 1% risk per trade, five consecutive losses in one day would hit that limit. Set a personal cap of 2 to 3 trades per day during the challenge. If all three lose, walk away. The challenge has unlimited time. Use it.
How EdgeFlo Helps You Execute the Buffer Strategy
The buffer strategy works on paper, but executing it requires real-time awareness of your account state. EdgeFlo's risk calculator adjusts your position size based on your current balance, so when you drop to 0.5% risk, your lot sizes update automatically. No mental math. No guessing.
The trading dashboard tracks your equity curve during the challenge, making it obvious when you have crossed the de-risk threshold or recovered back to the starting balance. That visual reference keeps you honest. When the number on the screen says $97,800, you risk 0.5%. Period.
EdgeFlo's guardrails can also block trades that exceed your risk limit. If you set your maximum risk at 0.5% during a drawdown phase and accidentally enter a position that is too large, the guardrail flags it before the trade goes through. You can override it, but you have to choose to, which forces the decision to be conscious rather than accidental.
What is the buffer strategy for funded challenges?
Why drop to 0.5% instead of staying at 1%?
Do I need a high win rate to pass a funded challenge?
When should I increase risk above 1% during a challenge?

Turn discipline on.
Every session.
EdgeFlo is the environment serious traders operate inside.
Start 7-Day Trial — $7
Cancel anytime.
No long-term commitment.


Think Different, Trade Different.