

Trading Drawdown Recovery: The De-Risking Framework
Recover from trading drawdown without revenge trading or overleveraging. Use the 1% to 0.5% de-risking framework to preserve capital and rebuild steadily.

Trading drawdown recovery requires cutting your risk, not increasing it. When your account drops from $100,000 to $95,000, the instinct is to trade bigger and "make it back fast." That instinct is wrong. The correct move is to reduce risk from 1% to 0.5% per trade, take fewer positions, and let the math work in your favor. One winning trade at 0.5% risk with a 1:3 risk-to-reward ratio recovers the equivalent of three losing trades at the same level.
Drawdowns are not the problem. How you respond to them is.
TL;DR
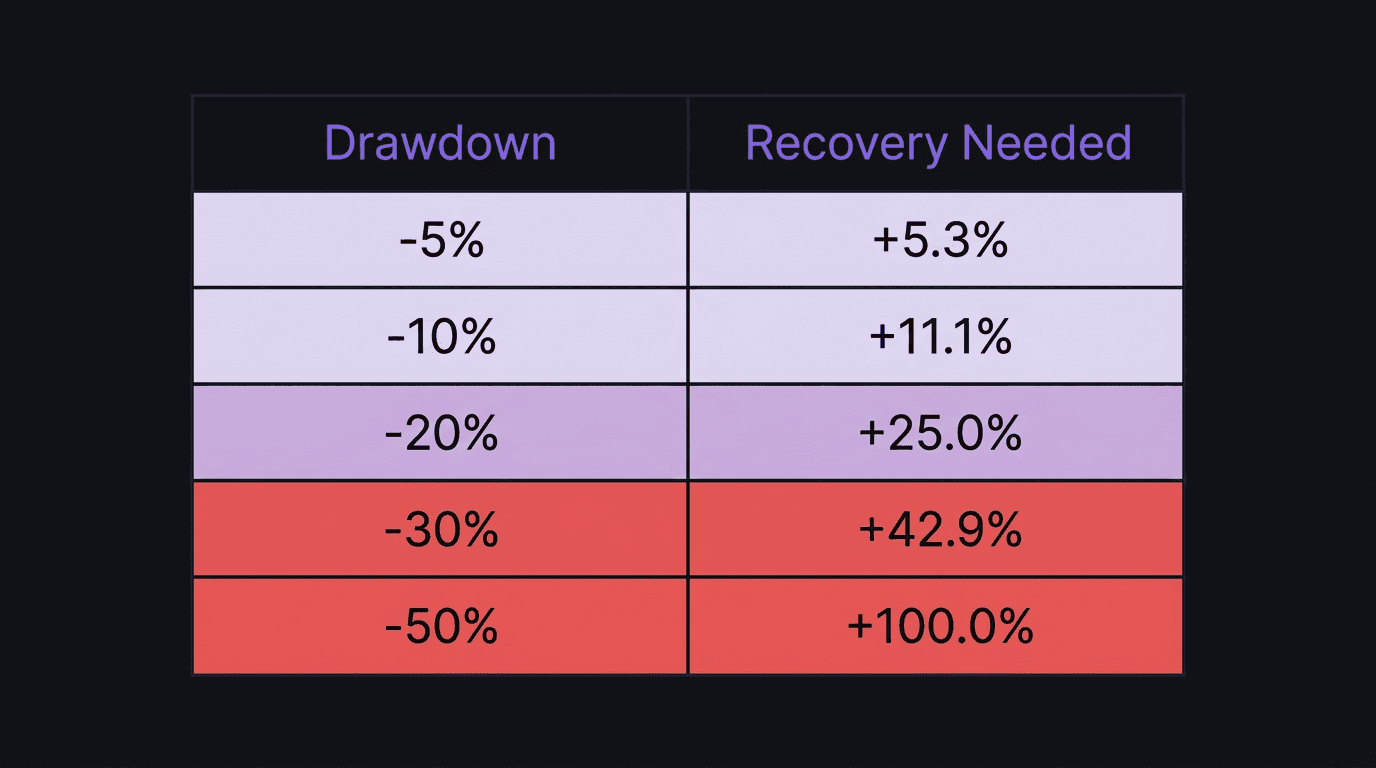
A 10% loss requires an 11.1% gain to break even. A 20% loss requires 25%. A 50% loss requires 100%. The deeper you go, the harder it gets.
Cut risk from 1% to 0.5% per trade when your balance drops below a predetermined threshold (e.g., $98k on a $100k account).
One 1:3R winner at 0.5% risk gives +1.5%, covering three losing trades at the same level. You are always one good trade away.
Never increase position size during drawdown. That is revenge trading with extra steps.
Only increase risk again after building a 5% buffer above your starting balance.
Why Drawdown Gets Worse Before It Gets Better
Drawdown has a compounding problem that works against you.
When you lose 10%, you do not need a 10% gain to recover. You need 11.1%. Lose 20%, you need 25%. Lose 50%, you need 100%, meaning you need to double your remaining capital just to get back to where you started.
Drawdown | Recovery Needed | Why It Feels Worse |
|---|---|---|
-5% | +5.3% | Barely noticeable |
-10% | +11.1% | Uncomfortable but doable |
-20% | +25.0% | Requires several good weeks |
-30% | +42.9% | Months of disciplined trading |
-50% | +100.0% | Nearly impossible at normal risk |
This asymmetry is why capital preservation matters more than profit maximization. Every additional percentage point of drawdown makes the recovery disproportionately harder.
And here is the psychological trap: the deeper you fall, the more desperate you feel. That desperation pushes you to increase size, skip your rules, and take trades you would never touch on a normal day. Which creates more drawdown. Which creates more desperation. The spiral feeds itself.
The only way to break it is a system that removes emotion from the sizing decision. That system is de-risking.
The Math: Why Recovery Takes Longer Than You Think
Suppose you have a $100,000 account and you trade at 1% risk per trade with a 50% win rate and 1:2 risk-to-reward ratio. Your expected gain per trade (expectancy) is:
(0.50 x $2,000) - (0.50 x $1,000) = $500 per trade
At one trade per day, you make roughly $500/day in expected value. That is $2,500/week or roughly $10,000/month.
Now you hit a drawdown and your balance drops to $90,000. You need +$10,000 to recover. At $500/day expectancy, that takes 20 trading days. A full month.
But it gets worse. Your account is smaller now. At 1% risk on $90,000, each trade risks $900 instead of $1,000. Your expectancy drops to $450/day. Recovery stretches to 22+ days.
What do most traders do at this point? They bump risk to 2% to "get back faster." Now each loss costs $1,800 instead of $900. Two consecutive losses (which happens all the time) turn a -10% drawdown into -13.6%. The recovery math just got significantly harder.
This is the single biggest mistake traders make during drawdown: trying to outrun the math by adding risk. The math always wins.
The De-Risking Framework (1% to 0.5% Switch)
De-risking is simple. When your balance drops below a predetermined level, you cut your risk per trade in half. Not as a punishment. As protection.
The Rules
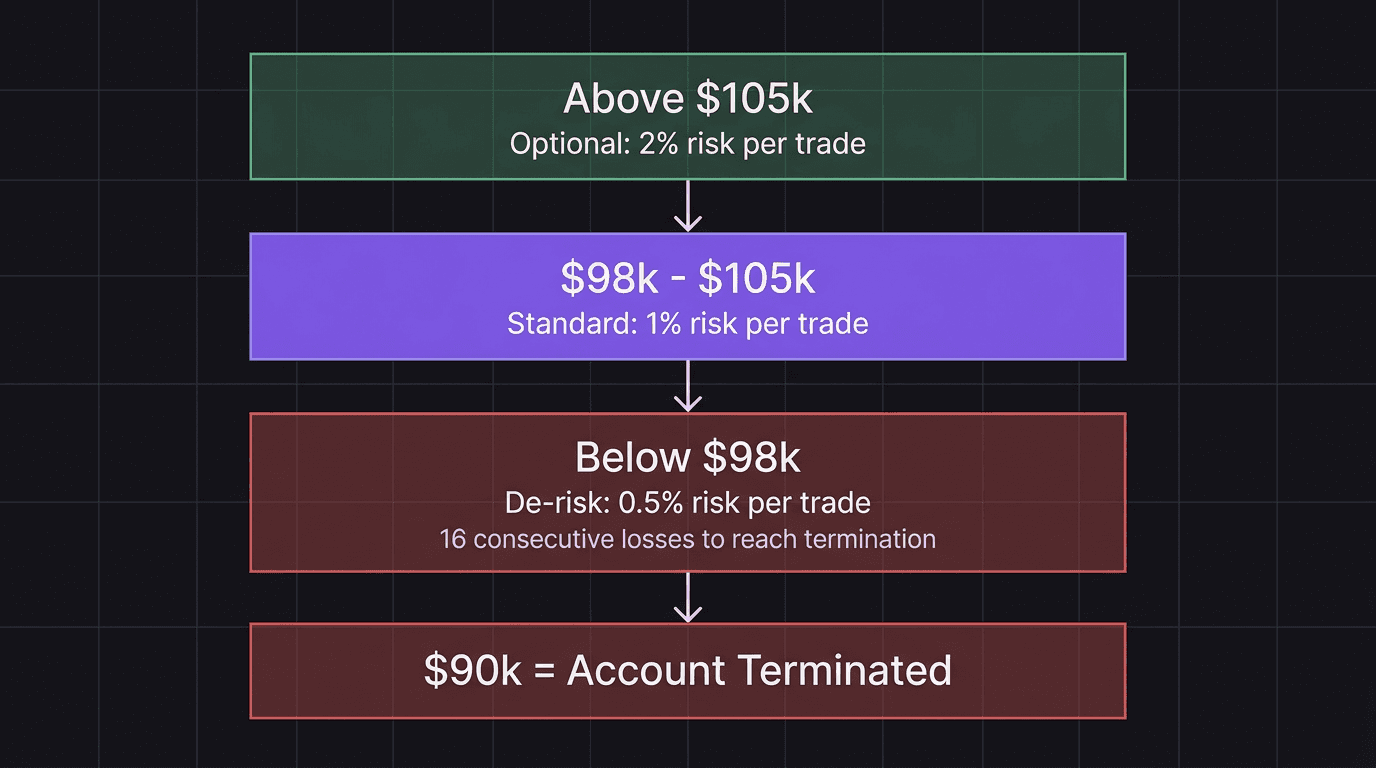
On a $100,000 funded account with a 10% maximum overall drawdown (hard floor: $90,000):
Balance $98,000 and above: Risk 1% per trade. Normal operations.
Balance below $98,000: Switch to 0.5% per trade. Capital preservation mode.
Balance at $105,000 (5% buffer above start): Optionally increase to 2% per trade to accelerate.
The $98,000 threshold is not random. It gives you an $8,000 cushion above the $90,000 termination line. At 0.5% risk ($490 per trade at $98k), you can absorb 16 consecutive losing trades before hitting the hard floor. Sixteen. In a row. That is a statistical near-impossibility with any tested strategy.
Why 0.5% Risk Is Not "Too Small"
At 0.5% risk with a 1:3 risk-to-reward ratio:
One winning trade at 1:3R = +1.5% gain
Three losing trades at 0.5% = -1.5% loss
One winner covers three losers
So even with a 25% win rate at 1:3R, you break even. Most tested strategies run 40-50% win rates on 1:2 or 1:3 setups. At 0.5% risk, you have massive room for error.
The trade that turns your drawdown around does not need to be a home run. It needs to be a clean 1:3R setup at half your normal size. That is it.
Here is the mindset shift: you are not trying to recover quickly. You are trying to avoid getting terminated. Speed is the enemy during drawdown. Survival is the goal.
When to Increase Risk Again
Do not increase risk the moment you crawl back to breakeven. That is like sprinting right after a knee injury because the pain stopped.
The Buffer Rule
Only consider increasing risk after your balance exceeds your starting point plus a buffer:
Starting balance: $100,000
Buffer target: $105,000 (5% above start)
Only at $105,000+: Optionally increase to 2% per trade
The buffer serves two purposes. First, it proves you are trading well again, not just getting lucky on one trade. Second, it gives you a $5,000 cushion so that increasing to 2% does not immediately put you back in danger.
What "Optionally" Means
Increasing to 2% is not required. Many funded traders stay at 1% permanently and scale by adding accounts instead of adding risk. Two $100k accounts at 1% risk gives you the same total capital exposure as one account at 2%, with the advantage that blowing one account does not affect the other.
If you choose to increase, do it for a fixed period (e.g., one week) and evaluate. If you take a loss at 2% and feel the urge to increase further, you have your answer: go back to 1%.
A Drawdown Recovery Walkthrough ($100k Account)
This walkthrough covers a realistic drawdown and recovery sequence. Not a best-case scenario. A grinding, uncomfortable, real one.
Week 1: The Slide
You start Monday with a $100,000 funded account, trading at 1% risk. Monday and Tuesday go well: +$2,400. Balance: $102,400.
Wednesday, the market chops. You take three trades on EUR/USD during London session. All three hit stops. Loss: -$3,072 (three trades at 1% of $102,400). Balance: $99,328.
Thursday, you try to recover. You take two trades on GBP/JPY. One winner at 1:2 (+$1,987), one loser (-$993). Balance: $100,322. You feel like you are back.
Friday, news hits. You hold through an FOMC-related spike and take a -$2,006 loss on a position that gapped through your stop. Balance: $98,316.
You are below $98,000. De-risking triggers. Risk drops to 0.5% per trade.
Week 2: Capital Preservation Mode
Monday, you feel the pull to trade at 1% "just to get back above $98k." You do not. You trade at 0.5%.
You take two trades. One winner at 1:3R (+$1,475), one loser (-$492). Balance: $99,299.
Tuesday, one trade. Winner at 1:2R (+$993). Balance: $100,292.
You are above $100k again. But you do not go back to 1% yet. You stay at 0.5% through the end of the week. Two more trades: one winner, one loser. Balance: $101,278.
Week 3: Rebuilding
You return to 1% risk. You take 4 trades across the week. Two winners at 1:2 and 1:3, two losers. Net: +$3,051. Balance: $104,329.
Week 4: The Buffer
One more winning trade pushes you to $105,342. You now have a 5% buffer above your starting balance.
Total recovery time: roughly three weeks from the low point. It felt slow. Every day at 0.5% risk felt like you were barely moving. But you kept the account. You never breached the overall drawdown limit. And by week 4, you were in a stronger position than before the drawdown started.
What would have happened without de-risking? If you had stayed at 1% risk during Week 2 and taken the same trades, the results would have been similar in dollar terms. But if you had increased to 2% (as many traders do when desperate), one bad trade could have dropped you to $96,000. Two bad trades to $92,000. Friday, account terminated.
The de-risking framework did not make you more money. It kept you in the game long enough for normal edge to reassert itself.
What About the Trader Who Does Not De-Risk?
Compare the walkthrough above to this version. Same account, same market, different response.
After Friday's loss puts the balance at $98,316, the trader does not de-risk. Instead, they increase to 2% on Monday to "make it back fast." They lose two trades: -$3,932. Balance: $94,384.
Now they are panicking. They increase to 3% on Tuesday. One loss: -$2,832. Balance: $91,552. They are $1,552 from account termination.
They freeze. They cannot trade at all because any position could end the account. The fear is paralyzing. Two weeks of careful work undone in two days of emotional sizing.
That is not a worst-case scenario. That is what happens to funded traders every day.
Preventing Deep Drawdowns in the First Place
Recovery is harder than prevention. Always. The best drawdown strategy is avoiding a deep one in the first place.
Three Prevention Rules
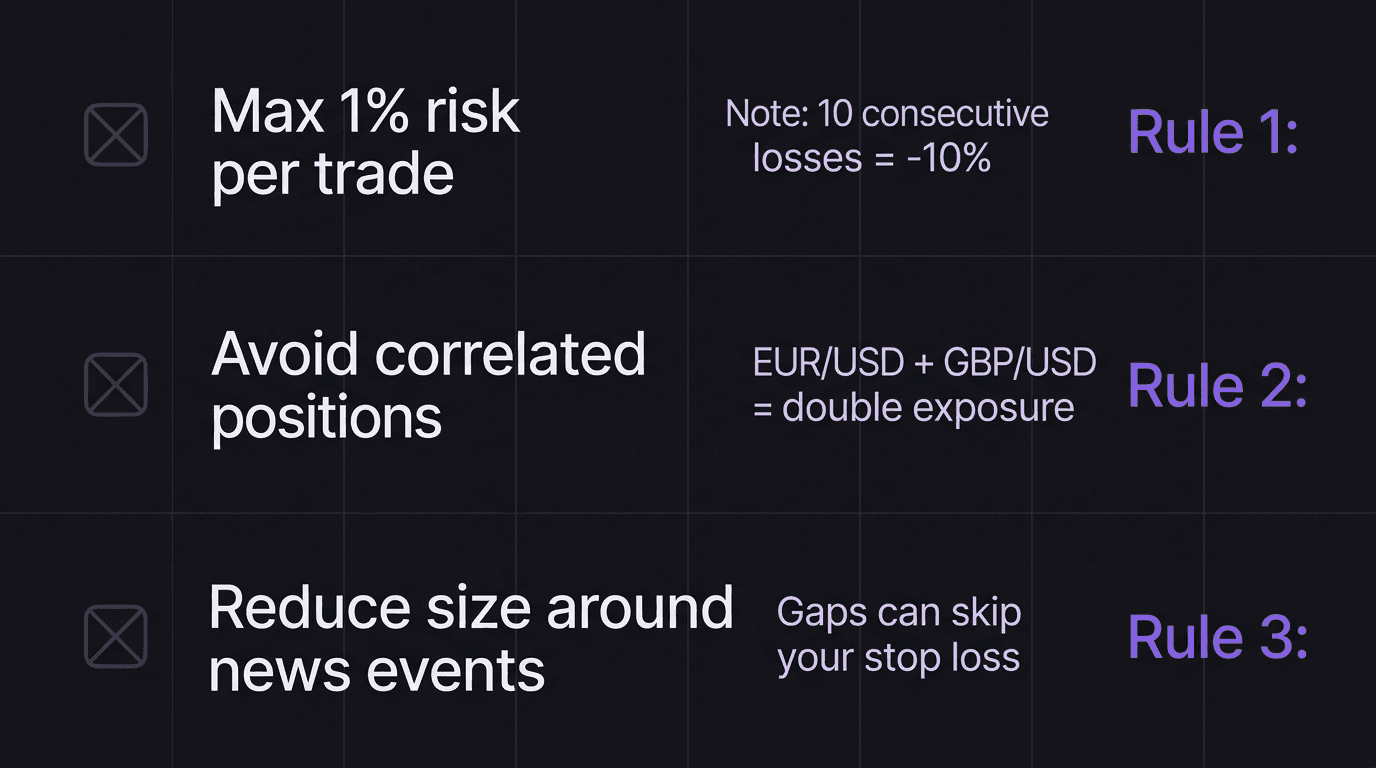
1. Never risk more than 1% per trade. This is not conservative. This is survival math. At 1%, you can take 10 consecutive losses and still be at -10% (the maximum overall drawdown on most funded accounts). At 2%, five losses put you there.
2. Avoid correlated positions. Long EUR/USD and long GBP/USD at the same time is essentially a double position on dollar weakness. If the dollar strengthens, both trades lose. Two positions at 1% risk each become a de facto 2% risk on a single directional bet.
3. Reduce or stop trading during news events and low-volume sessions. Most gap-through-stop losses happen around major economic releases. You cannot control the gap. You can control whether you are in the market when it happens.
Backtesting your strategy across 100+ historical trades gives you the data to know your maximum historical drawdown. If your backtest shows a worst-case drawdown of -8%, you know that a -6% live drawdown is uncomfortable but within expected parameters. Without that data, every drawdown feels like the end.
How EdgeFlo Helps You De-Risk Automatically
EdgeFlo auto-calculates lot size based on your account balance, risk per trade percentage, and stop loss distance. When you set risk to 0.5%, it adjusts every trade automatically. No manual calculations, no spreadsheet, no accidentally fat-fingering a lot size when you are stressed.
The risk-per-trade guardrail adds another layer. Set it to 1% and EdgeFlo flags any trade that exceeds that threshold. There is an override option (you are always in control), but the friction of seeing that warning is often enough to make you pause and reconsider. That pause is the difference between a controlled drawdown and a blown account.
Pair the guardrails with a trade journal that tracks your P&L, drawdown curve, and risk levels over time, and you build a dataset that shows exactly how your account behaves during losing streaks. That data replaces emotion with evidence. Confidence comes from competence, not from hoping the next trade works out.
The Edge Brief
Receive Insights on trading psychology, discipline, and the behavioral patterns that create consistent traders from our Founder and the EdgeFlo team, delivered to your inbox.
Think different. Trade different.
How long does it take to recover from a trading drawdown?
Should you reduce position size during a drawdown?
What is the biggest mistake traders make during drawdown?
When should you increase risk after a drawdown recovery?

Turn discipline on.
Every session.
EdgeFlo is the environment serious traders operate inside.
Start 7-Day Trial — $7
Cancel anytime.
No long-term commitment.


Think Different, Trade Different.