

Funded Challenge Risk Framework: The 3-Tier System
Pass your funded challenge with the 3-tier risk framework: 1% default, 0.5% de-risk at -2%, optional 2% acceleration at +5%. Step-by-step mechanics.

Most traders who fail funded challenges do not fail because of bad entries. They fail because they never adjust their risk as their account balance shifts. They start at 1%, stay at 1% even when they are down 4%, and blow through the drawdown limit on a single bad morning.
A funded challenge risk framework solves this by giving you pre-set rules for when to tighten risk, when to hold steady, and (only during the challenge) when to push harder. The 3-tier system covered here uses three simple triggers tied to your account balance: start at 1%, drop to 0.5% when you are down 2%, and optionally scale to 2% once you are up 5%. No guessing, no emotional decisions mid-drawdown.
TL;DR
Start every funded challenge risking 1% per trade. On a $100k account, that is $1,000 per position.
Drop to 0.5% risk when your account falls to $98,000 (down 2%). This halves your exposure before you reach the drawdown limit.
Optionally increase to 2% risk when your account hits $105,000 (up 5%). This accelerates the challenge, but only use it during the evaluation phase.
Use set-and-forget execution with a minimum 1:3 risk-to-reward ratio. No micromanaging, no moving stops.
After funding, forget Tier 3. Live funded accounts are about capital preservation, not acceleration.
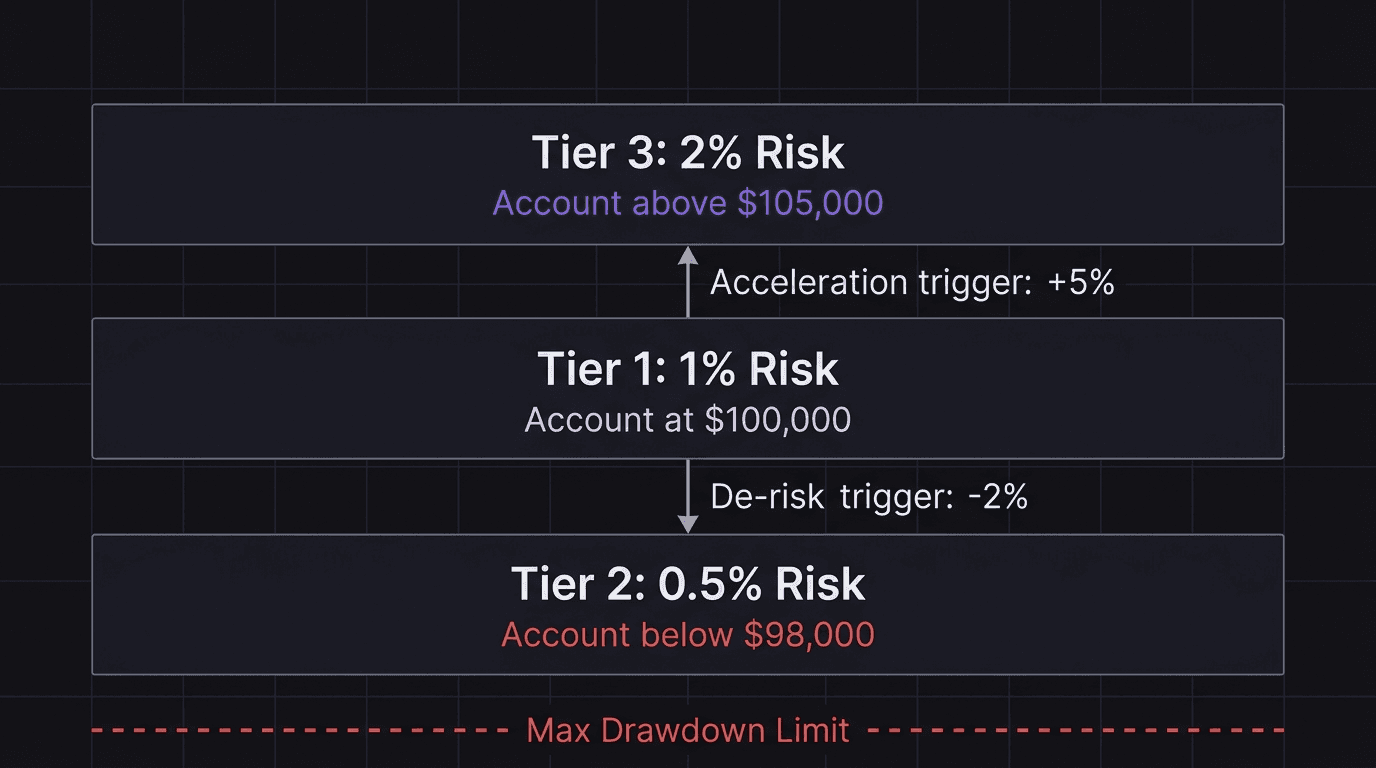
The 3-Tier Risk System
The idea is straightforward. Your risk per trade should not be static. It should respond to where your equity sits relative to two danger lines: the drawdown limit below you and the profit target above you.
Here is the full framework for a $100k funded challenge account:
Tier | Trigger | Risk Per Trade | Dollar Risk ($100k) | Purpose |
|---|---|---|---|---|
Tier 1 | Starting balance | 1% | $1,000 | Default operating mode |
Tier 2 | Account drops to $98,000 (down 2%) | 0.5% | $490 | Protect against drawdown breach |
Tier 3 | Account rises to $105,000 (up 5%) | 2% | $2,100 | Accelerate toward profit target (challenge only) |
The system runs on a minimum 1:3 risk-to-reward ratio with set-and-forget execution. You place the trade, set your stop loss and take profit, and walk away. No partial closes, no trailing stops mid-trade, no "just this once" adjustments.
Why 1:3 minimum? Because at a 40% win rate (which is realistic for most funded challenge strategies), 1:3 keeps you profitable. You lose more often than you win, but each win pays three times what each loss costs. The math works. We will prove it below.
Tier 1: Start at 1% Risk Per Trade
Tier 1 is your default. Every funded challenge begins here. On a $100k account, 1% risk means $1,000 per trade.
This is not aggressive, and that is the point. Most funded challenge rules set a maximum drawdown between 8% and 12%. If you risk 1% per trade, you can absorb 8 consecutive losers before hitting an 8% drawdown. That is a significant cushion.
Your job in Tier 1 is to execute your strategy cleanly and let the win rate and reward ratio do the work. Nothing else.
Walkthrough: Tier 1 in Action on EUR/USD
You are three days into a $100k challenge. Account balance: $100,000. You spot a setup on EUR/USD during the London session. Entry at 1.0850, stop loss at 1.0820 (30 pips), take profit at 1.0940 (90 pips).
At 1% risk, your position size needs to produce a $1,000 loss if price hits your stop. EUR/USD pip value is $10 per pip per standard lot. Here is the sizing math:
$1,000 risk divided by 30 pips = $33.33 per pip needed. $33.33 divided by $10 per pip (EUR/USD standard lot) = 3.33 lots.
You place 3.33 standard lots. Price hits your take profit at 1.0940 (90 pips from entry).
3.33 lots at $10 per pip = $33.30 per pip. $33.30 per pip times 90 pips = $2,997 profit.
Your account moves from $100,000 to $102,997. You stay in Tier 1 and keep operating at 1% risk. No changes needed.
Tier 2: Drop to 0.5% When You Hit -2%
This is the survival tier. When your account balance drops to $98,000 (2% below starting balance), you cut risk in half. Instead of risking $1,000 per trade, you risk $490 (0.5% of $98,000).
Why -2%? Because most prop firms set their drawdown rules between 8% and 12%. If you are already down 2% and keep risking 1%, a streak of 6 losers puts you at -8%. That is the danger zone. Dropping to 0.5% doubles the number of consecutive losses you can absorb before hitting that limit.
The psychological benefit matters just as much. When you are down, every loss feels heavier. Your brain starts screaming to "make it back." Cutting risk in half removes the temptation to revenge trade your way out of a hole, because each individual trade matters less to your overall drawdown.
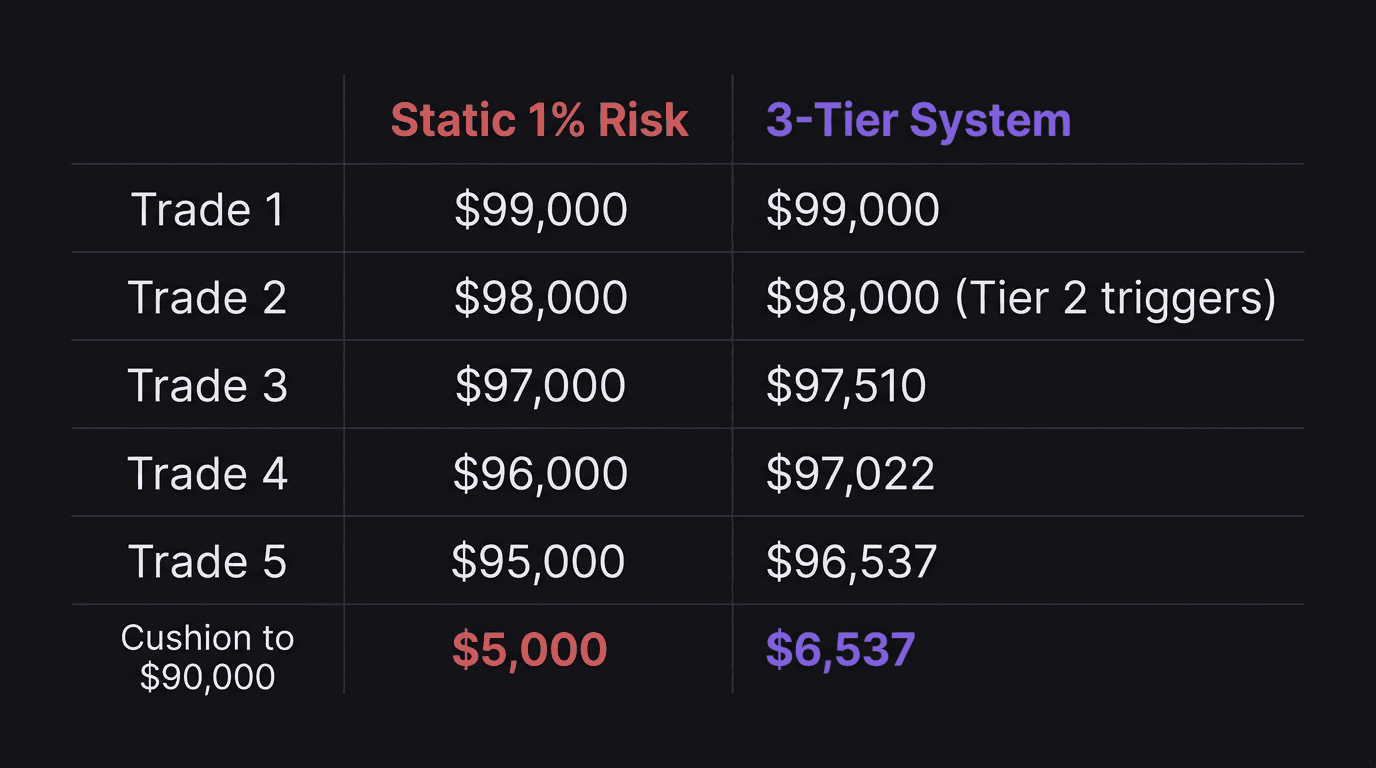
Walkthrough: What Happens Without Tier 2 (The Mistake)
Imagine the same $100k account. You take four losing trades in a row at $1,000 risk each. Account balance: $96,000.
But wait. The Tier 2 trigger was $98,000. You should have shifted to 0.5% risk after your second loss. Here is what the framework demands:
Trade 1: Loss. $100,000 minus $1,000 = $99,000. Still Tier 1.
Trade 2: Loss. $99,000 minus $1,000 = $98,000. Trigger: switch to Tier 2.
Trade 3: Loss at 0.5% risk. 0.5% of $98,000 = $490. Balance: $97,510.
Trade 4: Loss at 0.5% risk. 0.5% of $97,510 = $487.55. Balance: $97,022.
After four losses, the tiered trader sits at $97,022 instead of $96,000. That $1,022 difference is almost a full extra trade of breathing room. On a challenge with a 10% max drawdown ($90,000 floor), the tiered trader has $7,022 of cushion. The static trader has $6,000.
From $97,022 at 0.5% risk per trade, you can absorb roughly 14 more consecutive losers before reaching $90,000. The static trader at $96,000, still risking 1%, has about 6. That is the difference between surviving a losing streak and blowing a challenge.
Tier 3: Optional 2% at +5% (Challenge Only)
This tier exists only during the evaluation phase. Once you are funded with real capital, Tier 3 disappears.
When your account reaches $105,000 (up 5% from starting balance), you have a decision. You can stay at 1% and grind steadily toward the profit target. Or you can bump risk to 2% per trade to accelerate.
On a $100k challenge with a 10% profit target, the finish line is $110,000. At $105,000, you need $5,000 more. At 2% risk ($2,100 per trade on $105,000), a single 1:3 winner nets you:
$2,100 risk times 3 (reward ratio) = $6,300 profit.
One winning trade at Tier 3 would push you from $105,000 to $111,300, clearing the $110,000 target. That is the appeal.
But here is the catch. At 2% risk, a loss costs $2,100. Three consecutive losses would erode your buffer fast:
Loss 1: 2% of $105,000 = $2,100. Balance: $102,900.
Loss 2: 2% of $102,900 = $2,058. Balance: $100,842.
Loss 3: 2% of $100,842 = $2,017. Balance: $98,825.
Three losses at Tier 3 cost $6,175 total, dropping you from $105,000 to $98,825. That erases most of your buffer and puts you right at the Tier 2 trigger. Tier 3 is a calculated gamble. Use it only when:
Your strategy has been performing well during the challenge (not just one lucky trade).
You are comfortable that a loss will not trigger emotional spiraling.
You understand that losing the buffer means dropping back to Tier 1, possibly Tier 2.
The safer path? Stay at 1%. You are already ahead. There is no trophy for passing faster.
Why Tier 3 Dies After Funding
Once you pass the challenge and receive a funded account, the rules change. Challenge phases have a binary outcome: pass or fail. Speed matters because you are paying monthly fees or evaluation costs.
Live funded accounts are different. The firm takes a profit split (usually 80/20 or 90/10), and there is no time limit on earning. Your goal shifts from "reach the target" to "stay consistent and never breach drawdown." Keeping risk at 1% (with Tier 2 protection) is the smart play for long-term funded trading.
A reasonable monthly target on a live funded account is 5%. On a $100k account, that is $5,000 per month. At 1% risk with 1:3 reward and a 40% win rate, here is the expected outcome per 20 trades:
20 trades at 40% win rate = 8 wins, 12 losses.
Each win: 1% risk times 3R = 3% gain.
Each loss: 1% risk = 1% loss.
Net per 20 trades: (8 times 3%) minus (12 times 1%) = 24% minus 12% = 12% net gain.
That is well above the 5% monthly target, which means you can afford losing streaks and still hit your goal. No reason to push Tier 3 on a live account.
How Your Equity Curve Shapes the Decision
The tier system only works if you actually follow the triggers. The biggest failure mode is not the math. It is the trader ignoring the switch point.
Here is what typically happens. You are at $98,500. One more loss at 1% ($985) drops you to $97,515, which is below the $98,000 trigger. But you "feel" like the next trade is a winner. So you stay at 1%.
That next trade loses. Now you are at $97,515 and still risking 1% instead of 0.5%. You have burned through extra cushion because you did not follow the rule when the trigger hit.
The fix is simple: treat the tier triggers as mechanical rules, not suggestions. When your balance hits $98,000, your next trade is at 0.5%. No exceptions, no "just one more at 1%."
This connects directly to position sizing. Your lot size is not a feeling. It is a calculation based on your current tier, your stop distance, and your account balance right now.
Scaling After You Pass
Passing one challenge is not the finish line. It is the starting position.
The real scaling strategy for funded traders is not increasing lot sizes on a single account. It is stacking multiple funded accounts. Pass a $100k challenge, operate it conservatively at 1% risk, and then start a second $100k challenge on the side. Repeat.
At two funded accounts ($200k total), you earn the same monthly return with the same 1% risk per account. At four accounts ($400k total), the math scales linearly. You never need to push beyond 1% risk on any single account, which means you never put any individual account at unnecessary risk.
Keep a buffer zone in every funded account: leave 2% to 5% of profits untouched. If your account hits $105,000, do not withdraw $5,000 and reset to $100,000. Leave $2,000 to $3,000 in as a cushion. This protects you during the next inevitable losing streak and keeps you further from the drawdown limit.
Good Losses vs. Bad Losses
Not every losing trade is a failure. This distinction matters more in funded accounts than anywhere else, because every loss feels like it is bringing you closer to elimination.
A good loss is a trade that followed your plan, had a valid setup, proper position sizing, and hit your predetermined stop loss. You executed correctly. The market just did not cooperate. These losses are the cost of doing business.
A bad loss is a trade you should not have taken. Wrong session, no clear setup, oversized position, or you moved your stop loss to "give it room." Bad losses are the ones that actually blow funded accounts, because they tend to cluster. One bad trade leads to frustration, which leads to another bad trade, which leads to revenge trading at full size while already in Tier 2.
The 3-tier system cannot protect you from bad losses. Only discipline can. But it can reduce the damage when bad losses happen, because at 0.5% risk, even a bad trade costs half as much.
How EdgeFlo Keeps You on the Right Tier
The hardest part of this framework is not understanding it. It is following it in real time when you are down $2,000 and your next setup looks perfect.
EdgeFlo's auto risk calculator shows your current risk tier based on your account balance. You enter your account size and the calculator shows whether you should be at 1%, 0.5%, or (during a challenge) 2%. There is no mental math, no forgetting where you stand.
The guardrails add another layer. When your balance approaches the daily loss limit or your drawdown buffer gets thin, EdgeFlo warns you before you place the next trade. You can override the warning (you always can), but you have to consciously choose to break the rule. That one extra step is often enough to stop a bad decision.
Combined with set-and-forget execution, the framework becomes mechanical. Calculate your tier, size your position, place the trade, walk away. Review after the session, not during it.
What is a good risk per trade for a funded challenge?
When should I reduce risk during a funded challenge?
Can I increase risk to pass a funded challenge faster?
How many trades does it take to pass a funded challenge with this system?

Turn discipline on.
Every session.
EdgeFlo is the environment serious traders operate inside.
Start 7-Day Trial — $7
Cancel anytime.
No long-term commitment.


Think Different, Trade Different.