

How to Define Your A+ Trade Setup
An A+ trade setup checks every box in your plan. Learn how to build a checklist that filters out low-quality trades and only lets the best setups through.

Every trader has a strategy. But most traders do not have a clear definition of when that strategy is at its best.
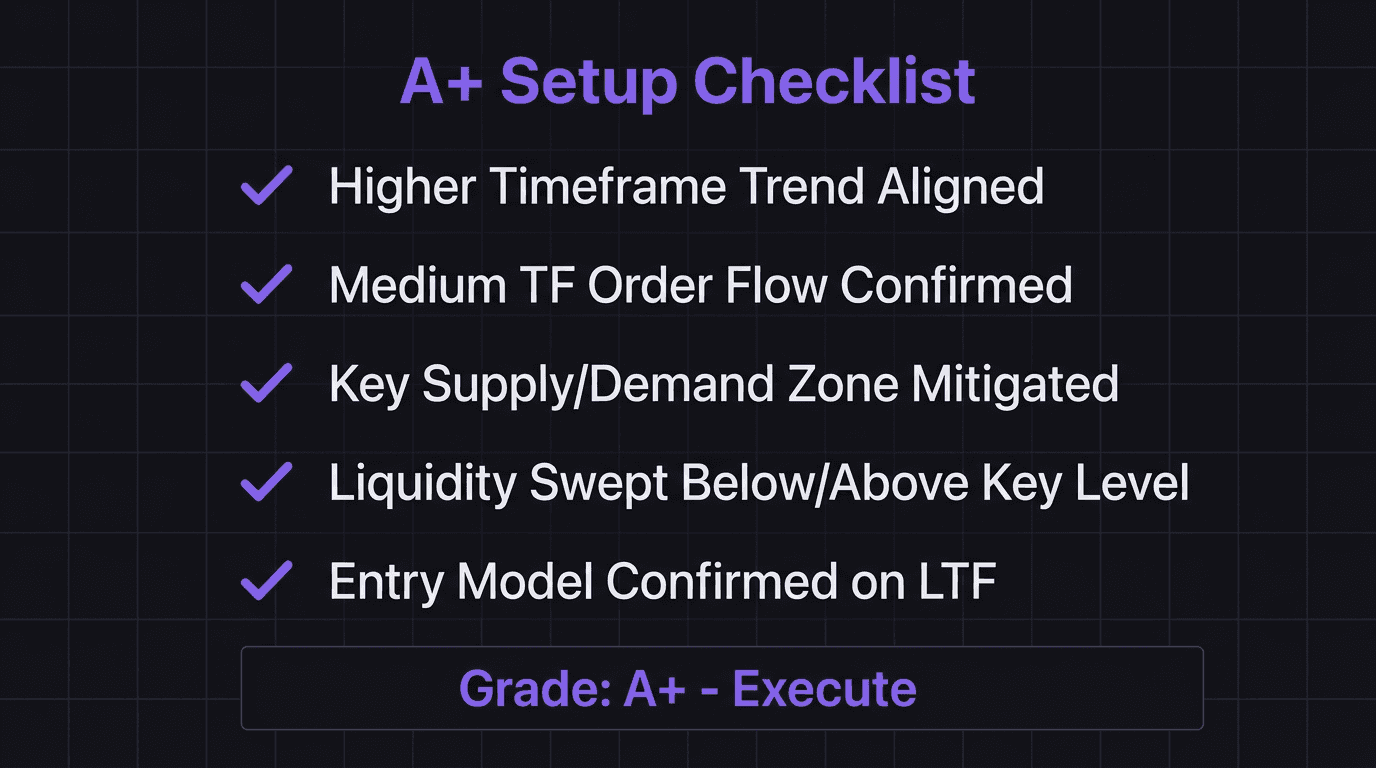
An A+ trade setup is not a different strategy from the one you already use. It is your strategy operating at maximum confluence, where every condition in your plan lines up at the same time. Higher timeframe aligned. Entry model confirmed. Liquidity swept. Risk-to-reward favorable. All boxes checked.
When you only trade A+ setups, two things happen. Your win rate goes up because you are filtering out weak entries. And your average R goes up because high-confluence setups tend to produce larger moves. One trader who restricted himself to A+ setups only after a $30,000 losing week made $58,000 on just two trades. Both were high-confluence entries where every criterion was met.
The hard part is not finding A+ setups. It is having the discipline to skip everything else.
TL;DR
An A+ setup means every criterion in your trading plan is confirmed, not "close enough."
Build a 5 to 7 point checklist that defines your A+ criteria; anything below full marks does not get traded.
One trader took only 2 A+ trades in three weeks and produced $58,000 in gross profit.
Grade every potential trade before entry using a simple A/B/C system.
Skipping B and C setups protects your capital for when A+ setups appear.
What Makes a Setup A+
An A+ setup is defined by confluence. Each element of your trading plan must be present and confirmed before you enter. Not "probably there." Not "forming." Confirmed.
Here is what confluence looks like in practice. Imagine your plan has five criteria:
Higher timeframe trend direction (4H chart shows bullish or bearish structure)
Medium timeframe order flow aligned with the higher timeframe
Key level interaction (price mitigated a supply or demand zone at your point of interest)
Liquidity swept (stop losses below a swing low or above a swing high have been triggered)
Entry model confirmed on the lower timeframe (fractal market shift, break of structure, or your specific trigger)
When all five conditions are present, the setup is A+. When four out of five are present, it is a B setup. When three or fewer are present, it is a C setup.
The difference between A+ and B might seem small. But that missing element changes the probability distribution significantly. A B setup with no liquidity sweep means you might enter just before the market sweeps your stop to grab the liquidity it needed. A B setup with no higher timeframe alignment means you are trading against the dominant trend.
Most losses come from trading B and C setups. The trader who lost $30,000 in one week admitted that his first two trades were entries where the setup was not fully confirmed. He saw price moving, felt urgency, and entered before the liquidity sweep happened. Both were B setups at best. Both lost.
His third trade followed the plan but lost to choppy market conditions. That was a legitimate A+ trade that lost due to variance. The difference matters: bad losses from B setups are preventable. Losses from A+ setups are the cost of doing business.
Build Your A+ Checklist
Your A+ checklist is the filter between your analysis and your execution. Without it, analysis becomes rationalization: you see what you want to see and enter on hope instead of evidence.
Here is how to build your checklist using your existing strategy:
Step 1: List every condition your strategy requires.
Write down every element that must be present for your setup. Do not leave anything out, even conditions you "always check mentally." If it is not written down, it does not exist under pressure.
Step 2: Rank each condition by importance.
Some conditions are non-negotiable (higher timeframe alignment, risk-to-reward minimum). Others are desirable but not critical (ideal entry timing, perfect candle formation). Your non-negotiables form the A+ checklist. The desirable extras determine whether an A+ setup is "strong A+" or "borderline A+."
Step 3: Set the minimum bar.
Define the exact number of conditions that must be met for each grade:
A+: All non-negotiable conditions confirmed. Trade it.
B: One non-negotiable missing. Skip it.
C: Two or more missing, or relying on gut feeling. Do not touch it.
If you use a pre-trade checklist, integrate the grading directly into it. Before each trade, run through the checklist and assign a grade. If the grade is below A+, close the chart on that setup.
Step 4: Test the checklist against historical data.
Go back through your last 30 to 50 trades and retroactively grade each one. Which trades were A+ by your new criteria? Which were B or C?
Then compare the results. If your A+ trades have a significantly higher win rate and average R than your B and C trades, your checklist is working. If the difference is small, your criteria might need refinement.
This is where backtesting your trading strategy directly improves your live results. The checklist is only as good as the evidence behind it.
Skip Everything Below A+
This is where most traders fail. Building the checklist is easy. Following it when you have been watching charts for four hours and nothing has appeared is hard.
The urge to downgrade your standards is strongest when:
You have not traded in several days
You just took a loss and want to recover
You see a setup that is "close" and convince yourself the missing element does not matter this time
Other traders are posting wins and you feel left behind
Every one of these situations tempts you to trade a B setup. And every B setup you take dilutes your trading edge.
Think of it like a restaurant with a reputation for perfect steaks. If they start serving decent-but-not-perfect steaks to fill seats on slow nights, the reputation erodes. Your edge works the same way. If you trade B setups to stay active on slow weeks, your overall results erode to the point where you cannot tell if your strategy works or if you are just gambling with extra steps.
The if-then structure helps here. Write your rule as: "If the setup is graded B or below, then I do not trade it. No exceptions." Remove the decision from the moment. The rule already decided for you.
Walkthrough: One A+ Trade vs Five B Trades
Consider this real scenario from a month of GBP/JPY trading.
The trader could have taken five borderline setups over the month. On each one, the higher timeframe was aligned and the supply or demand zone was present, but the liquidity sweep had not happened yet. Four out of five criteria met. Close enough?
If he had taken all five, based on his historical data for B setups, he would expect a win rate of roughly 25 to 30%. That means one or two wins out of five, with small R on the winners because the entries were not at optimal levels. Net result: roughly break-even or slightly negative after commissions.
Instead, he waited. He sat out for seven days after his losing week and only entered when the full A+ setup appeared on GBP/JPY. The higher timeframe was bullish. The medium timeframe showed higher highs and higher lows. Price pulled back to a demand zone, swept the liquidity below the swing low, and produced a confirmed fractal market shift.
Every box checked. He entered and made $22,000.
On the next A+ setup, he found the same full confluence: supply zone mitigated after sweeping highs, break of structure confirmed on the lower timeframe, and the higher timeframe aligned bearish. He entered, sized up slightly to 1.5% risk because of the high conviction, and captured $36,000.
Two A+ trades. $58,000. Compare that to five B trades that would have netted roughly zero.
The math is not even close. Build your trading playbook around A+ criteria and let the B setups pass.
How EdgeFlo Helps You Filter for A+ Setups
EdgeFlo's Edge plan builder lets you document your entry criteria, including the specific conditions that define your A+ setup. When you set an active plan, those criteria stay visible during your trading session as a live reference.
After each trade, EdgeFlo's post-trade self-reporting asks whether the setup met your criteria. Over time, this builds a data set that shows your win rate and average R broken down by setup grade. You get concrete evidence of whether your A+ filter is working, and you can see exactly how much B and C setups are costing you.
The plan stats feature (available on Plus) tracks how your plan performs over time, so you can refine your A+ definition based on real results rather than guesswork.
The Edge Brief
Receive Insights on trading psychology, discipline, and the behavioral patterns that create consistent traders from our Founder and the EdgeFlo team, delivered to your inbox.
Think different. Trade different.
What makes a trade setup A+ versus B or C?
How many criteria should an A+ checklist have?
Should I ever trade a B setup?
How do I build confidence in my A+ criteria?

Turn discipline on.
Every session.
EdgeFlo is the environment serious traders operate inside.
Start 7-Day Trial — $7
Cancel anytime.
No long-term commitment.


Think Different, Trade Different.