

Trade the Second Move, Not the First
The first move in any session or setup is almost always the trap. Learn a repeatable rule for waiting on the second displacement as your entry trigger.

There is a saying on Wall Street: being early is just as bad as being wrong. And in most setups, the first move is exactly where "early" lives.
The first displacement in a session, after a news event, or off a key level is almost always the liquidity grab. Institutions use it to clear stop orders, fill positions, and set up the real direction. If you trade the first move, you are the fuel. If you wait for the second, you are the passenger.
This is not a theory. It is a repeatable rule that changes your execution quality overnight.
TL;DR
The first move in most setups is a liquidity sweep, not the real direction.
Institutions need the first move to collect orders before deploying capital.
The second move shows intent, confirmed by structure shift and follow-through.
Building a "second move only" rule into your plan reduces fake-out losses immediately.
Patience is the edge. Missing the first move is not a missed opportunity.
Why the First Move Exists to Trap You
Markets do not move on logic alone. They move on orders. And large orders need liquidity to fill without moving price against the buyer or seller.
When a session opens, or a news event hits, or price reaches a key level, retail traders react. They place market orders, set breakout entries, and stack stop losses at obvious levels. This burst of retail activity is exactly what institutions wait for.
The first move serves one purpose: to trigger those retail orders and convert them into institutional fill liquidity. A spike above a resistance level triggers buy stops, which are instant market buy orders. Institutions sell into that buying pressure, getting filled at premium prices. Then the real move begins, and price drops.
This happens at:
Session opens (London open, New York open)
News events (FOMC, NFP, CPI releases)
Key technical levels (equal highs, equal lows, range boundaries)
Demand and supply zone tests
The pattern is the same everywhere. First move sweeps. Second move runs.
What the Second Move Tells You That the First Cannot
The first move is noise dressed up as signal. The second move is signal.
Here is why. After the first move sweeps liquidity, institutions have their fills. Now they need price to move in their direction to profit. The second displacement is this directional push, and it comes with qualities the first move lacks:
Follow-through: The second move has multiple candles pushing in the same direction. The first move is typically one or two candles that immediately stall or reverse.
Structure shift: On a lower timeframe, the second move breaks the most recent swing point in the new direction. If the first move pushed up and the second move pushes down, you will see the most recent higher low violated on the 5-minute or 1-minute chart.
Volume commitment: The second move draws in additional participants who confirm the direction. The first move draws in victims.
Zone creation: The origin of the second move often creates a high-quality entry zone for retests. The origin of the first move is where trapped traders entered.
Walkthrough: London Open on EUR/USD
EUR/USD at London open. Pre-London range between 1.0850 and 1.0870. At 8:00 AM London time, price spikes to 1.0882, breaking above resistance. A breakout trader buys at 1.0875 with a stop at 1.0855 (20-pip risk, $200 per standard lot at $10/pip). Within 15 minutes, the spike stalls. Price drops back below 1.0870, back into the range. This is the first move, the trap.
By 8:30 AM, price drops to 1.0842, sweeping the stops below the range support at 1.0850. This is the second move, the real direction. A trader who follows the second-move rule enters short at 1.0848 after a 5-minute structure shift confirms bearish direction. Stop at 1.0868 (20-pip risk, $200). Price continues to 1.0780 by the US session, a 68-pip move. That is 3.4R, or $680 per standard lot.
The breakout trader lost $200. The second-move trader made $680. Same session, same pair, opposite results.
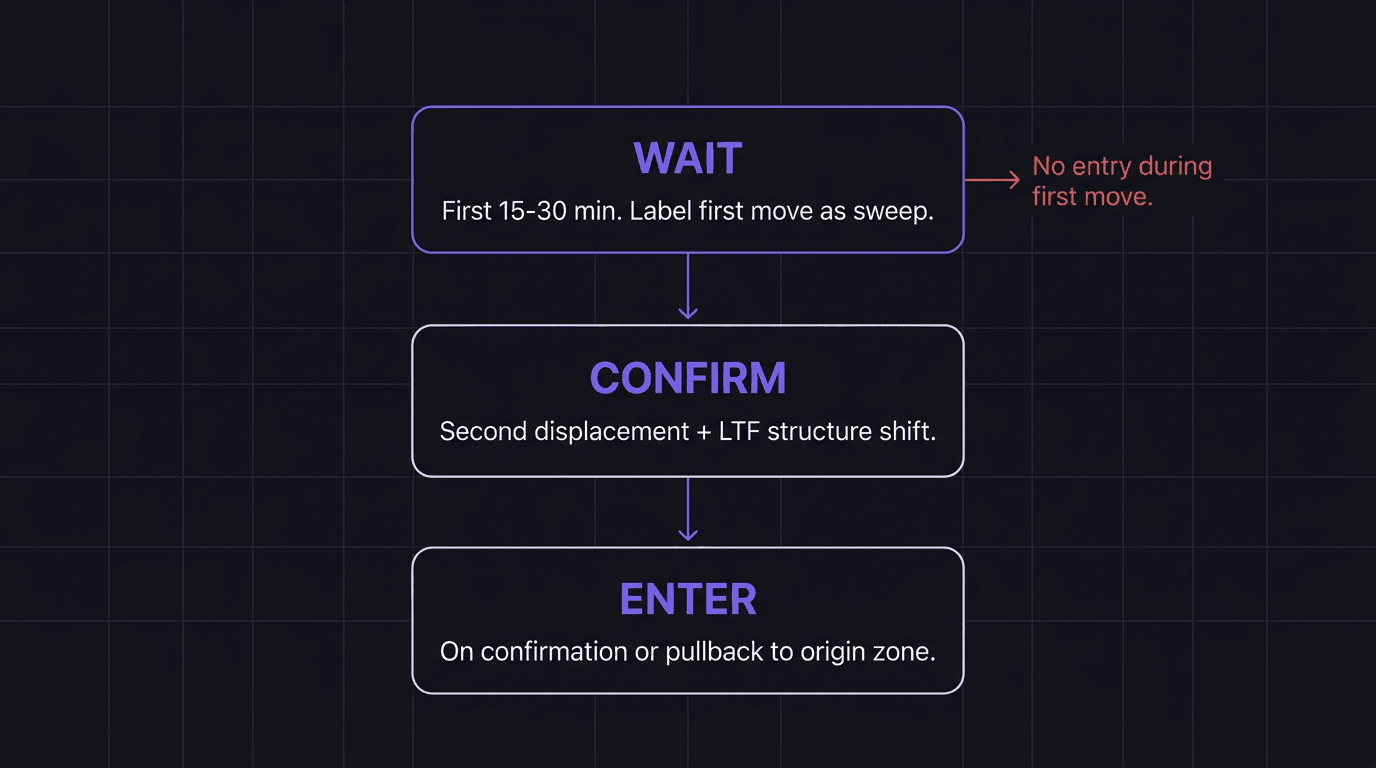
A Simple Rule: Wait, Confirm, Enter
Turn the concept into a mechanical execution rule:
Step 1: Wait. When a session opens or a key level is hit, do nothing for the first 15 to 30 minutes. Watch the first displacement happen. Identify which direction the first move went. Label it as the sweep.
Step 2: Confirm. Look for the second displacement in the opposite direction. Confirm it with a structure break on a lower timeframe. The most recent swing point in the original direction should be violated. If you see follow-through candles and a clean structure shift, you have confirmation.
Step 3: Enter. Enter on the confirmation or wait for a pullback into the origin zone of the second move. Place your stop beyond the sweep extreme of the second move. Target the next liquidity pool in the direction of the second displacement.
This three-step process applies everywhere. It is not pair-specific or timeframe-specific. The principle is universal because the liquidity mechanics are universal.
Examples Across Sessions and Timeframes
The second-move rule shows up everywhere. Here are three more contexts:
News events: FOMC announces a rate decision. Price spikes 80 pips in one direction within seconds. That is the first move. Within 15 to 30 minutes, price reverses and pushes the opposite direction with sustained momentum. The second move is the real institutional direction.
Daily chart swing trades: Price approaches a weekly demand zone and pushes below it by 30 pips. That is the first move, sweeping the weekly level. Price then reverses, reclaims the zone, and runs 200 pips over three days. The second move built on the liquidity from the first.
Intraday supply zone test: Price reaches an H1 supply zone and pushes 10 pips above it. Breakout traders enter long. Price reverses and drops 50 pips. The first push above was the sweep; the drop was the real move.
Walkthrough: What "Missing" the First Move Actually Looks Like
A trader sees USD/JPY spike from 150.20 to 150.60 at New York open. They wait. Price reverses from 150.60, drops below 150.20, and continues to 149.80. The trader enters short at 150.15 after a 5-minute structure shift. Stop at 150.40 (25-pip risk). At approximately $6.60/pip per standard lot, risk is $165. Price reaches 149.80, a 35-pip move, for $231 reward. That is 1.4R. Not the biggest winner, but the trader who chased the first move at 150.50 with a stop at 150.20 lost $198 before the real direction even appeared.
The "missed" trade was never the trade. The second move was.
How EdgeFlo Tracks Your First vs Second Move Stats
Knowing the rule and following it are two different things. The gap between them is where most traders leak money.
EdgeFlo's trading journal with auto-import captures every trade. Tag each entry as "first move" or "second move" in your post-trade review. After a month, pull up your stats. Compare win rates, average R, and profit factor between the two categories. Most traders discover their first-move trades cluster around breakeven or worse, while their second-move trades carry a clear edge.
The Edge plan builder lets you write this as an explicit execution rule: "No entries during the first 15 minutes of the session" or "All zone entries require a prior sweep." That rule stays visible on screen during your trading session. You can override it (the override is always available), but the act of seeing the rule before you break it creates a friction point that stops impulsive first-move trades.
Your dashboard tracks the data. Your plan defines the rule. Your journal proves whether you followed it. That feedback loop is what turns a concept into a habit.
Why is the first move usually a trap?
How do I identify the second move?
Does the second-move rule work on all timeframes?
What if I miss the second move entirely?

Turn discipline on.
Every session.
EdgeFlo is the environment serious traders operate inside.
Start 7-Day Trial — $7
Cancel anytime.
No long-term commitment.


Think Different, Trade Different.